
Aktifkan FTP server
Membuat FTP Server
di Solaris 10
halo para solaris user, yaaah mungkin artikel ini cupu
kali ya buat mereka solaris user,,
tapi mungkin akan berguna buat para pemula pemakai
solaris,,
oke begini nih cara membuat server ftp menggunakan
solaris:
jadi sebenernya ftp itu sudah ada di solaris 10, jadi
kita tinggal mengaktifkanya saja..
Mengetahui status FTP server kita
Code:
inetadm | grep ftp
Mengaktifkan FTP server kita
Code:
inetadm -e ftp
Menonaktifkan FTP Server
Code:
inetadm -d ftp
inetadm -d ftp
atau bisa juga seperti ini
“/usr/sbin/svcadm enable ftp“
“/usr/sbin/svcadm disable ftp”
“/usr/sbin/svcadm enable ftp“
“/usr/sbin/svcadm disable ftp”
dan di client juga harus di set,,caranya :
1.cd /etc
2.cd/ftpd
3.vi ftpusers
4.tambahkan # dibelakang root
5.save
The Impact of SMF on Network Services
The SMF has a major impact on network
services in that each service can
be independently enabled or disabled
using the inetadm command.
For example, consider the telnet facility:
# inetadm -l telnet
SCOPE NAME=VALUE
name="telnet"
endpoint_type="stream"
proto="tcp6"
isrpc=FALSE
wait=FALSE
exec="/usr/sbin/in.telnetd"
user="root"
default bind_addr=""
default bind_fail_max=-1
default bind_fail_interval=-1
(output omitted)
The various parameters and values can
be set using the inetadm
command. The values can then be stored
in the appropriate SMF reference
files for each service. Changes can be
maintained across system reboots.
To see whether or not the telnet facility is enabled, use the following
command:
# inetadm | grep telnet
enabled online svc:/network/telnet:default
To disable the telnet facility:
# inetadm -d telnet
# inetadm | grep telnet
disabled disabled svc:/network/telnet:default
To enable the telnet facility:
# inetadm -e telnet
# inetadm | grep telnet
enabled online svc:/network/telnet:default
Mengaktifkan & Menonaktifkan Network Interface di Solaris 10
Sung ajah nih cara ngaktifin network interface di solaris..
kan
bisanya kalo diketikin ifconfig
-a kan
gak keliatan tuh interface mana yg gak aktif,,
jadi
ketikin perintah dladm
show-link biar
keliatan naman interfacenya,,
setelah itu cara ngaktifinnya gini:
ifconfig nama interface plumb
misal:
ifconfig
nge0 plumb
trus dah gitu ngasi ip caranya:
ifconfig
nge0 inet 10.14.200.50 netmask 255.255.255.0
trus tinggal aktifin, gini caranya:vi
ifconfig
nge0 up
Untuk Menonaktifkan caranya:
ifconfig
nge0 down
ifconfig
nge0 unplumb
Konfigurasi Network (IP dan Routing) pada Solaris 10
Thursday, 18. March 2010, 07:31
Oke sekarang udah mulai main-main solaris..
namanya juga baru belajar..
jadi kita mulai dari setting IP aja deh..
untuk melihat interface apa saja yang ada pada mesin :
namanya juga baru belajar..
jadi kita mulai dari setting IP aja deh..
untuk melihat interface apa saja yang ada pada mesin :
# dladm show-link
untuk melihat apakah interface yang kita gunakan memiliki MAC address yang sama atau tidak kita ketikkan perintah :
# eeprom local-mac-address?
nah setelah itu bakal muncul penampakan seperti ini
artinya interface2 yang ada tidak memiliki MAC address yang sama
Agar interface pada dapat di PING, maka yang perlu dilakukan pada interface tersebut adalah :
1. interface tersebut harus di "plumb"
2. interface tersebut harus di konfigurasi
3. interfacenya harus UP
4. interface tersebut harus terhubung secara fisik dengan jaringan
5. interface tersebut harus memiliki konfigurasi routing yang benar.
so, kita mulai dari awal...
untuk tahap ini kita akan melakukan 3 tahap sekaligus (plumb + konfigurasi dan tentunya membuat interface itu UP)
berikut beberapa caranya :
# ifconfig hme0 plumb 192.168.0.31/24 up
# ifconfig hme0 plumb 192.168.0.31/24 broadcast + up
# ifconfig hme0 plumb 192.168.0.31 netmask 255.255.255.0 bradcast + up
untuk mengecek interface yang telah dikonfigurasi ketikkan :
# ifconfig -a
kalau mau ganti IP address yang sudah ada ini salah satu caranya :
# ifconfig hme0 down && ifconfig hme0 192.168.0.31 netmask 255.255.255.0 broadcast + up
interface sudah di konfigurasi dan UP..
Sekarang cek apakah kabel sudah terhubung dengan jaringan?
kalau sudah kita setting routing di solarisnya . . .
setting default routingnya kek gini :
# route add default 192.168.0.1
untuk setting routing static ke suatu jaringan kek gini :
# route add -net 10.10.10.0 192.168.0.1
untuk setting static routingnya ke host kek gini :
# route add 10.10.0.31 192.168.0.1
sekarang kita lihat tabel routingnya, dengan mengetikkan :
# netstat -rn
penampakan :
Routing Table: IPv4
Destination Gateway Flags Ref Use Interface
-------------------- -------------------- ----- ----- ---------- ---------
default 192.168.0.1 UG 1 7
10.10.0.31 192.168.0.1 U 1 58 hme0
10.10.10.0 192.168.0.1 U 1 35 hme0
127.0.0.1 127.0.0.1 UH 3 391 lo0
nah kalo ada kesalahan delete dulu yang sudah ada dengan cara :
# route delete -net 10.10.10.0 192.168.0.1
dan untuk route static ke host kita ketikkan perintah :
# route delete 10.10.0.31 192.168.0.1
atau
# route -n delete -interface 10.165.9.0/24 -gateway 10.165.9.253
baru setelah itu kita tambahkan tabel routing baru . . .
setelah semua terkonfigurasi kita lakukan saja tes ping.
kira-kira seperti ini penampakannya :
# ping 192.168.0.1
192.168.0.1 is alive
Hoooray...
tapi tunggu dulu konfigurasi kita belum sepenuhnya selesai..
soalnya semua konfigurasi diatas akan hilang ketika kita merestart mesin.
nah,agar semua konfigurasi tidak hilang ketika kita merestart mesin, maka berikut konfigurasinya..
kita masukkan beberapa settingan ke dalam file...
berikut beberapa konfigurasi dan file-filenya :
konfigurasi IP :
edit /etc/hosts
tambahkan :
edit /etc/netmasks
tambahkan :
edit /etc/hostname.hme0
tambahkan :
edit /etc/defaultrouter
tambahkan :
untuk static routing lainnya :
tambahkan file /etc/rc2.d/S98static-routes
route add 10.10.0.31 192.168.0.1
yup saya rasa cukup . . .
semua konfigurasi ini tidak akan hilang ketika mesin restart...
owh ya...
sedikit tambahan,,kalo mau ganti-ganti IP pada interface..
tidak perlu merestart mesin...
cukup ketikkan :
# svcadm restart network/physical
oke..
jaringan kita sudah jalan..
Mengenal Apa itu RAID
Definisi
RAID,
singkatan dari Redundant Array of Independent Disks merujuk
kepada sebuahteknologi di
dalam penyimpanan data komputer yang digunakan untuk mengimplementasikan fitur toleransi
kesalahan pada media penyimpanan komputer
(utamanya adalah hard disk) dengan menggunakan cara redundansi
(penumpukan) data,
baik itu dengan menggunakanperangkat
lunak, maupun unit perangkat
keras RAID terpisah. Kata “RAID”
juga memiliki beberapa singkatan Redundant Array
of Inexpensive Disks, Redundant Array
of IndependentDrives, dan juga Redundant Array of Inexpensive
Drives. Teknologi ini membagi atau mereplikasi data ke dalam beberapa hard
disk terpisah. RAID didesain untuk meningkatkan keandalan data
dan/atau meningkatkan kinerja I/O dari hard disk.
Sejak pertama kali diperkenalkan, RAID
dibagi ke dalam beberapa skema, yang disebut dengan “RAID
Level“. Pada awalnya, ada lima buah RAID
level yang pertama kali dikonsepkan, tetapi seiring dengan waktu, level-level
tersebut berevolusi, yakni dengan menggabungkan beberapa level yang berbeda dan
juga mengimplementasikan beberapa level proprietary yang tidak
menjadi standar RAID.
RAID menggabungkan beberapa hard
disk fisik ke dalam sebuah unit logis penyimpanan, dengan
menggunakan perangkat lunak atau perangkat
keras khusus. Solusi perangkat keras
umumnya didesain untuk mendukung penggunaan beberapa hard disk secara
sekaligus, dansistem operasi tidak
perlu mengetahui bagaimana cara kerja skema RAID tersebut. Sementara itu,
solusi perangkat lunak umumnya diimplementasikan di dalam level sistem
operasi, dan tentu saja menjadikan beberapa
hard disk menjadi sebuah kesatuan logis yang digunakan untuk melakukan
penyimpanan.
Konsepnya
Ada beberapa konsep kunci di dalam RAID: mirroring (penyalinan data ke lebih dari satu buahhard
disk), striping (pemecahan data ke beberapa hard disk) dan
juga koreksi
kesalahan, di mana redundansi data disimpan untuk
mengizinkan kesalahan dan masalah untuk dapat dideteksi dan mungkin dikoreksi
(lebih umum disebut sebagai teknik fault tolerance/toleransi
kesalahan).
Level-level RAID yang berbeda tersebut
menggunakan salah satu atau beberapa teknik yang disebutkan di atas, tergantung
dari kebutuhan sistem. Tujuan utama penggunaan RAID adalah untuk meningkatkan
keandalan/reliabilitas yang sangat penting untuk melindungi informasi yang sangat
kritis untuk beberapa lahan bisnis, seperti halnya basis
data, atau bahkan meningkatkan kinerja, yang
sangat penting untuk beberapa pekerjaan, seperti halnya untuk menyajikan video
on demand ke banyak penonton secara
sekaligus.
Konfigurasi RAID yang berbeda-beda akan
memiliki pengaruh yang berbeda pula pada keandalan dan juga kinerja. Masalah
yang mungkin terjadi saat menggunakan banyak disk adalah salah satunya akan
mengalami kesalahan, tapi dengan menggunakan teknik pengecekan kesalahan,
sistem komputer secara keseluruhan dibuat lebih andal dengan melakukan reparasi
terhadap kesalahan tersebut dan akhirnya “selamat” dari kerusakan yang fatal.
Teknik mirroring dapat
meningkatkan proses pembacaan data mengingat sebuah sistem yang menggunakannya
mampu membaca data dari dua disk atau lebih, tapi saat untuk menulis kinerjanya
akan lebih buruk, karena memang data yang sama akan dituliskan pada beberapa
hard disk yang tergabung ke dalam larik tersebut. Teknik striping, bisa
meningkatkan performa, yang mengizinkan sekumpulan data dibaca dari
beberapa hard disk secara sekaligus pada satu waktu, akan
tetapi bila satu hard disk mengalami kegagalan, maka keseluruhan hard disk akan
mengalami inkonsistensi. Teknik pengecekan kesalahan juga pada umumnya akan
menurunkan kinerja sistem, karena data harus dibaca dari beberapa tempat dan
juga harus dibandingkan dengan checksum yang ada. Maka, desain sistem RAID harus
mempertimbangkan kebutuhan sistem secara keseluruhan, sehingga perencanaan dan
pengetahuan yang baik dari seorang administrator jaringan sangatlah
dibutuhkan. Larik-larik
RAID modern umumnya menyediakan
fasilitas bagi para penggunanya untuk memilih konfigurasi yang diinginkan dan
tentunya sesuai dengan kebutuhan.
Beberapa sistem RAID dapat didesain
untuk terus berjalan, meskipun terjadi kegagalan. Beberapa hard disk yang
mengalami kegagalan tersebut dapat diganti saat sistem menyala (hot-swap) dan data dapat diperbaiki secara otomatis. Sistem
lainnya mungkin mengharuskanshutdown ketika data sedang diperbaiki.
Karenanya, RAID sering digunakan dalam sistem-sistem yang harus selalu on-line, yang selalu tersedia (highly available),
dengan waktu down-time yang, sebisa mungkin, hanya beberapa saat saja.
Pada umumnya, RAID diimplementasikan di
dalam komputer server, tapi bisa juga digunakan di dalam workstation. Penggunaan di dalam workstation umumnya digunakan
dalam komputeryang
digunakan untuk melakukan beberapa pekerjaan seperti melakukan penyuntinganvideo/audio.
Sejarahnya
Pada tahun 1978, Norman
Ken Ouchi dari International
Business Machines (IBM) dianugerahi paten Amerika
Serikat, dengan nomor 4092732 dengan judul “System
for recovering data stored in failed memory unit.” Klaim untuk paten
ini menjelaskan mengenai apa yang kemudian dikenal sebagai RAID 5 dengan
penulisan stripe secara penuh. Patennya pada tahun 1978
tersebut juga menyebutkan bahwa disk mirroring atau duplexing (yang
kini dikenal sebagai RAID 1)
dan juga perlindungan dengan paritas khusus yang didedikasikan (yang kini
dikenal dengan RAID 4)
bisa digunakan, meskipun saat itu belum ada implementasinya.
Istilah “RAID” pertama kali
didefinisikan oleh David
A. Patterson, Garth
A. Gibson dan Randy
Katz dari University of California, Berkeley, Amerika
Serikat pada tahun 1987, 9 tahun berselang setelah paten yang dimiliki
oleh Norman
Ken Ouchi. Mereka bertiga mempelajari tentang
kemungkinan penggunaan dua hard disk atau lebih agar terlihat
sebagai sebuah perangat tunggal oleh sistem yang menggunakannya, dan kemudian
mereka mempublikasikannya ke dalam bentuk sebuah paper berjudul “A Case
for Redundant Arrays of Inexpensive Disks (RAID)” pada bulan Juni 1988 pada saat konferensi SIGMOD. Spesifikasi
tersebut menyodorkan beberapa purwarupa RAID level, atau kombinasi dari
drive-drive tersebut. Setiap RAID level tersebut secara teoritis memiliki
kelebihan dan juga kekurangannya masing-masing. Satu tahun berselang,
implementasi RAID pun mulai banyak muncul ke permukaan. Sebagian besar
implementasi tersebut memang secara substansial berbeda dengan RAID level yang
asli yang dibuat oleh Patterson dan kawan-kawan, tapi implementasi tersebut
menggunakan nomor yang sama dengan apa yang ditulis oleh Patterson. Hal ini
bisa jadi membingungkan, sebagai contoh salah satu implementasi RAID 5 dapat
berbeda dari implementasi RAID 5 yang
lainnya. RAID 3 dan RAID 4 juga
bisa membingungkan dan sering dipertukarkan, meski pada dasarnya kedua jenis
RAID tersebut berbeda.
Patterson menulis lima buah RAID level
di dalam papernya, pada bagian 7 hingga 11, dengan membagi ke dalam beberapa
level, sebagai berikut:
·
RAID level pertama: mirroring
·
RAID level ketiga : Pengecekan
terhadap disk tunggal di dalam sebuah kelompok disk.
·
RAID level keempat: Pembacaan dan
penulisan secara independen
·
RAID level kelima :
Menyebarkan data dan paritas ke semua drive (tidak ada
pengecekan terhadap disk tunggal)
Mengubah Solaris Hostname Sun Solaris
picas.line
Sebelumnya
hati2 melakukan pengubahan ini karena bisa saja server menjadi error, sehingga
anda harus masuk dan menjalani editing pa
Dalam sistem operasi Solaris (OS), suatu proses yang kompleks diperlukan untuk mengubah hostname server. Untuk mengubah hostname di Solaris, file-file berikut harus diedit:
/etc/hosts
Ini akan menunjukkan alamat IP untuk nama host.
/etc/nodename
Hal ini mirip dengan Linux
/etc/hostname.hme0
hme0 bisa saja bernama ce0 atau yang lainnya yang merupakan primary LAN atau eth. 'hme0' adalah nama dari interface, yang dapat diambil dari 'ifconfig' perintah. Memodifikasi hostname di sini.
/etc/net/tic*/hosts
Ubah informasi semua ada di sini (3 file) untuk menyelaraskan dengan semua data dalam file yang disebutkan di atas. apabila menggunakan editor vi gunakan :n untuk lanjut ke file berikutnya
/etc/resolv.conf
Tentukan resolusi domain dan informasi DNS server di lokasi ini file.
/etc/defaultrouter
Masukkan alamat IP router default host Solaris di sini.
Setelah mengedit data pada lokasi file-file ini, pergi ke command prompt dan ketik hostname. Reboot server dan menguji perubahan untuk memastikan beroperasi dengan baik.
Sebuah OS berbasis Unix, Solaris diluncurkan oleh Sun Microsystems pada tahun 1992..
Solaris OS adalah karena populer untuk skalabilitasnya (jaringan, proses, atau kemampuan sistem untuk menangani meningkatnya multitasking), khususnya dalam Proses Scalable Arsitektur (SPARC) sistem. Solaris juga menopang server dan workstation berbasis SPARC dan x86 (instruksi yang paling komersial luas menset arsitektur dalam komputasi pribadi), yang berasal dari SunOS dan vendor sistem lainnya. Upaya yang dilakukan untuk mendukung berbagai platform lainnya.
Solaris disertifikasi melalui Spesifikasi Single Unix. Awalnya diciptakan sebagai perangkat lunak berpemilik, sekarang didukung oleh sistem dari vendor server utama. Sebagian besar codebase (semua kode sumber yang digunakan dalam membangun komponen tertentu atau aplikasi) saat ini software open-source dari program OpenSolaris.
Shut Down atau Reboot Sistem Solaris
picas.line
Solaris
biasanya digunakan sebagai sistem operasi server. Karena itu, Anda ingin
memastikan bahwa Anda menutup sistem seaman mungkin untuk memastikan tidak ada
kerusakan data. Untuk setiap aplikasi yang terinstal pada server, Anda harus
memastikan bahwa Anda memiliki script yang benar untuk mematikan layanan.
Anda memiliki lebih dari satu pilihan perintah yang dapat Anda gunakan. Perintah terbaik adalah ini, dijalankan sebagai root:
shutdown -y -i5 -g0
Ini akan segera menutup sistem bawah. Anda juga dapat menggunakan perintah yang lebih tua yang masih bekerja:
sync;sync;init 5
Anda bahkan dapat menggunakan:
poweroff
Reboot
Jika Anda mencoba untuk reboot sistem sebagai lawan untuk mematikannya, Anda bisa menggunakan:
shutdown -y -i6 -g0
Atau:
sync;sync;init 6
Atau bahkan:
reboot
Begitu banyak perintah untuk melakukan hal yang sama, tapi tidak apa-apa, pilih dan ingat yang termudah yang masih berfungsi.
Veritas
Hari Selasa, Rabu, dan Kamis lalu saya mengikuti training VERITAS Storage
Foundations yang diadakan oleh kantor saya. Mengundang trainer dari
salah satu perusahaan IT di Jakarta, saya dan rekan-rekan cukup menikmati
training kali ini. Materi yang cukup menyenangkan dan kesempatan untuk
mencoba-coba sendiri materi yang diajarkan membuat kami betah bertahan di ruang
training meskipun jam sudah menunjukkan pukul 18.00 (padahal jadwalnya training
berlangsung dari pukul 09.00 sampai pukul 17.00 J Kasihan juga trainer-nya
terpaksa menunggui kami berlatih sampai lewat waktu
.Sebentar-sebentar…saya lupa menjelaskan apa itu VERITAS Storage Foundation. VERITAS SF adalah salah satu produk dari VERITAS (yang sekarang sudah diakuisisi oleh Symantec Corp.) yang berguna untuk mengatur penggunaan storage (harddisk) dan manajemen file dengan skala besar. Di dalam VERITAS SF yang kami pelajari sebagai materi pokok adalah VERITAS Volume Manager (VxVM).
Misalnya kami punya storage berisi 20 harddisk (@147GB), bagaimana cara kita me-manage penggunaan harddisk sebanyak itu : bagaimana mengalokasikan sejumlah spaceharddisk ke server tertentu, bagaimana mengatur multipathing, bagaimana mengatur redundancy, bagaimana mengatur backup data yang ada di dalam harddisk. Kira-kira seperti itu materi yang kami pelajari selama 3 hari kemarin.
Konsep dasar VxVM kira-kira seperti gambar berikut ini (ini cara bodoh-bodohan saya untuk menjelaskan pemanfaatan VxVM) :
RAID 1 Di Solaris 10
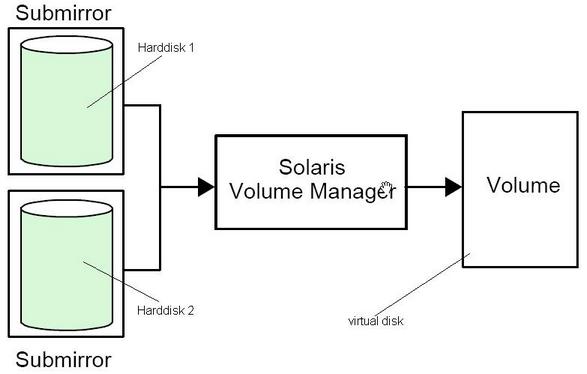
RAID (redundant array of inexpensive disks) adalah gabungan beberapa harddisk untuk menjalankan fungsi tertentu; bisa untuk mirroring, atau bisa juga untuk menggabungkan volume dari beberapa harddisk menjadi 1 kesatuan virtual disk. Ada beberapa level RAID. Di tulisan ini saya hanya mau menulis soal RAID 1. RAID 1 adalah RAID level yang digunakan untuk mirroring 2 atau lebih harddisk. Mirroring gampangnya dapat disebut sebagai kloning harddisk.Misalkan sebuah harddisk yang berisi sistem operasi Solaris 10, digabungkan dengan sebuah harddisk lain menggunakan RAID 1. Harddisk kedua akan berisi sama persis seperti harddisk pertama. Harddisk kedua ini akan membackupharddisk utama bilamana terjadi kerusakan pada harddisk pertama; begitu pula sebaliknya (dengan kata lain kedua harddisk saling menjaga kelangsungan kerja sistem). Kedua harddisk bekerja secara redundant. Sistem tidak akan mati jika salah satu dari harddisk gagal berfungsi. Dengan demikian RAID 1/mirroring salah satu cara untuk meningkatkan performansi sistem. Sistem operasi yang bekerja di dalamnya akan melihat kedua harddisk tersebut sebagai sebuah harddisk saja (virtual disk). Lihat ilustrasi berikut ini :
Solaris 10 memiliki fitur untuk membuat RAID, yaitu Solaris Volume Manager. Jadi dengan Solaris kita bisa membuat mirroring 2 atau lebih harddisk. Pada gambar di atas misalkan kita memiliki 2 harddisk dalam sebuah sistem. Ketika dibuat menjadi RAID 1, harddisk pertama akan dikenal sebagai submirror 1 dan harddisk kedua akan dikenal sebagai submirror 2. Virtual disk adalah perangkat yang dikenali oleh sistem operasi setelah proses mirroring dilakukan.
Berikut ini adalah contoh command line yang digunakan untuk membuat mirror dari 2 harddisk yang terpasang pada sebuah server dengan Solaris 10 sebagai sistem operasi. Harddisk pertama adalah
c0t0d0 (sebagai system disk), harddisk
kedua adalah c1t0d0.- Mula-mula
kita lihat dulu konfigurasi file
vfstabuntuk melihat mount point dari masing-masing slice. Contohnya seperti ini :
2. # more /etc/vfstab
3. /dev/dsk/c0t0d0s0 /dev/rdsk/c0t0d0s0 / ufs 1 no -
4. /dev/dsk/c0t0d0s1 swap - - - -
5. /dev/dsk/c0t0d0s3 /dev/rdsk/c0t0d0s3 /var ufs 1 no -
6. /dev/dsk/c0t0d0s4 /dev/rdsk/c0t0d0s4 /opt ufs 2 yes -
/dev/dsk/c0t0d0s5 /dev/rdsk/c0t0d0s5 /export/home ufs 2 yes -
- Kita harus membuat salinan dari VTOC (volume table of contents) yang berisi informasi partisi harddisk pertama.
# prtvtoc /dev/rdsk/c0t0d0s2 | fmthard –s - /dev/rdsk/c1t0d0s2
- Langkah
berikutnya adalah membuat
metadbdari mirror yang akan kita buat.Metadbini adalah file database yang akan menampung semua data konfigurasi mirror yang dibuat. Sebaiknyametadbini diletakkan pada slice yang belum terpakai, dalam kasus inimetadbdiletakkan pada slice 7.
# metadb –a –c 3 –f c0t0d0s7 c1t0d0s7
- Tiap slice yang ada di dalam harddisk kita buat virtual devicenya dengan
perintah
metainit.
10.# metainit –f d11 1 1 c0t0d0s0
11.# metainit –f d12 1 1 c1t0d0s0
12.# metainit d10 –m d11
13.# metainit –f d21 1 1 c0t0d0s1
14.# metainit –f d22 1 1 c1t0d0s1
15.# metainit d20 –m d21
16.# metainit –f d31 1 1 c0t0d0s3
17.# metainit –f d32 1 1 c1t0d0s3
18.# metainit d30 –m d31
19.# metainit –f d41 1 1 c0t0d0s4
20.# metainit –f d42 1 1 c1t0d0s4
21.# metainit d40 –m d41
22.# metainit –f d51 1 1 c0t0d0s5
23.# metainit –f d52 1 1 c1t0d0s5
# metainit d50 –m d51
- Setelah kita membuat virtual device untuk masing-masing slice, kita perlu memberitahu operating system bahwa root sistem sekarang berupa virtual device bukan slice harddisk lagi.
# metaroot d10
- Restart server
# shutdown -g0 -i6 -y
- Tambahkan virtual device yang berasal dari harddisk keduake mirror yang bersesuaian.
27.# metattach d10 d12
28.# metattach d20 d22
29.# metattach d30 d32
30.# metattach d40 d42
# metattach d50 d52
- Lihat
status mirror yang terbentuk dengan
perintah
# metastat, seharusnya pada tahap ini kedua harddisk sudah mulai melakukan proses sinkronisasi. Kalau anda melihat filevfstabsetelah proses mirroring ini maka file ini sudah berbeda dengan yang kita lihat pada awal proses ini.
32.# more /etc/vfstab
33./dev/md/dsk/d10 /dev/md/rdsk/d10 / ufs 1 no -
34./dev/md/dsk/d20 swap - - - -
35./dev/md/dsk/d30 /dev/md/rdsk/d30 /var ufs 1 no -
36./dev/md/dsk/d40 /dev/md/rdsk/d40 /opt ufs 2 yes -
/dev/md/dsk/d50 /dev/md/rdsk/d50 /export/home ufs 2 yes -Sebaiknya harddisk yang akan dijadikan mirror berada pada kontroler yang berlainan dengan sistem disk. Pada contoh di atas, harddisk pertama dan kedua berada pada kontroler yang berlainan.
Unmirroring RAID 1 di Solaris 10
Tulisan ini saya buat untuk menjawab pertanyaan mas Taufik tentang bagaimana cara melepas mirror file system di Solaris. Dulu saya pernah menulis tentang bagaimana membuat mirror file system di Solaris 10. Proses mirroring yang sudah pernah saya tuliskan tersebut menggunakan Solaris Volume Manager. Ok supaya lebih jelas saya tulis sekali lagi tentang apa itu mirrorfile system (RAID 1). Singkat saja hanya untuk memberi gambaran umum.Ketika kita menginstal Solaris ke dalam sebuah komputer/server, kita menginstal Solaris ke dalam harddisk yang selanjutnya kita sebut sebagai boot disk. Untuk meningkatkan redundansi/keamanan data, sebaiknya harddisk tersebut kita buat copy-nya atau dengan kata lain mirror-nya. Solaris sebagai operating system tidak tahu bahwa harddisk yang digunakan ada 2 (boot disk&mirror-nya). Solaris tetap akan menganggap bahwa sistemnya diletakkan pada sebuah harddisk. Padahal yang sebenarnya terjadi setelah proses mirroring adalah Solaris sebenarnya melihat sebuah virtual disk yang merupakan gabungan antara boot disk dan mirror-nya. Dengan kata lain hardisk pertama akan menjadi submirror 1 dan harddisk kedua akan menjadi submirror 2. Baik submirror 1 dan submirror 2 menyimpan informasi yang sama dan terus menerus melakukan sinkronisasi. Tiap kali booting, submirror 1 (harddisk pertama) yang akan bekerja. Submirror 2akan bekerja bilamana submirror 2 mengalami masalah (baik secara logical maupun secara physical). Kita pun bisa memaksa Solaris untuk melakukan booting dari submirror 2. Dengan adanya mirror, operating system dan data akan tetap aman bilamana salah satu harddisk mengalami kerusakan.
Kok mau singkat tetap saja jadi panjang ya , saya coba ringkas lagi prinsip mirroring file system jadi seperti ini (mudah-mudahan jauh lebih ringkas) :
- Instal OS ke dalam harddisk A.
- Jadikan harddisk A sebagai submirror 1.
- Tambahkan harddisk B sebagai submirror 2.
- Gabungkan submirror 1 dan submirror 2 sebagai sebuah virtual boot disk. Gabungan ini kita sebut sebagai mirror C.
- Atur Solaris supaya mengenali mirror C tadi sebagai system disk. Alih-alih menulis data hanya ke dalam hardisk A yang terjadi sekarang adalah setiap kali menulis data Solaris akan menulis ke dalam mirror C, data yang ditulis akan tercantum baik di harddisk A maupun di harddisk B.
- Jalankan
perintah
metastatuntuk memeriksa semua submirror dalam kondisi OK. - Untuk melepas masing-masing submirror, perintahnya adalah seperti berikut ini :
# metadetach
d10 d12
# metadetach d20 d22# metadetach d30 d32# metadetach d40 d42# metadetach d50 d52- Jalankan
perintah
metarootlagi untuk mengembalikan konfigurasi direktori root, kali ini format perintah yang digunakan adalah seperti berikut :
# metaroot
-r /dev/dsk/c0t0d0s0 - Edit file
/etc/vfstabsupaya menggunakan konfigurasi awal (seperti awal setelah instalasi).
# more
/etc/vfstab
/dev/dsk/c0t0d0s0 /dev/rdsk/c0t0d0s0
/ ufs
1 no -/dev/dsk/c0t0d0s1
swap - -
- -/dev/dsk/c0t0d0s3 /dev/rdsk/c0t0d0s3
/var ufs 1 no
-/dev/dsk/c0t0d0s4 /dev/rdsk/c0t0d0s4
/opt ufs 2
yes -/dev/dsk/c0t0d0s5 /dev/rdsk/c0t0d0s5
/export/home ufs 2 yes -- Reboot server dengan perintah berikut ini :
# shutdown
-i6 -y -g0- Setelah reboot dan Solaris sudah up kembali, jalankan perintah berikut ini :
# metaclear
-r d10
# metaclear -r d12# metaclear -r d20# metaclear -r d22# metaclear -r d30# metaclear -r d32# metaclear -r d40# metaclear -r d42# metaclear -r d50# metaclear -r d52
This entry was posted in Uncategorized. Bookmark the permalink.
20 Responses to Unmirroring RAID 1 di Solaris 10
- jesiesays:
Tutorial yang mantaf!!!
selama belum ada disclaimer lu g bertanggung jawab atas
tutorial lu, mesin production boleh di tes kan?
- tedysays:
@ jesie : yang penting kan dah di-backup Jes
datanya
- taufiksays:
Yoi om. mantafff
- tedysays:
@ taufik : sesuai permintaan Anda tuh Mas
- jesiesays:
kemaren gw ngelakukan kesalahan pada proses
seperti diatas karena masih tersisa disk submirror d0 & d10 (& OS
Solaris akhirnya masuk ke mode maintenance, ini yang gw lakukan:
1.Setelah masuk ke modus maintenance masuklah ke
modus OBP, dengan command init 0 atau halt
2. Setelah ini di OK prompt ketikan OK boot cdrom
-s (inget DVD/CD OS itu penting xixixixi)
3. Tunggu beberapa saat, setelah masuk ke mode
single user, lakukan:
# fsck /dev/rdsk/c2t0d0s2
# fsck /dev/rdsk/c2t0d0s2
- jesiesays:
3. Tunggu beberapa saat, setelah masuk ke mode
single user, lakukan:
# fsck /dev/rdsk/c2t0d0s2
# fsck /dev/rdsk/c2t0d0s2
- jesiesays:
# fsck /dev/rdsk/c2t0d0s2
- jesiesays:
kemaren gw ngelakukan kesalahan pada proses
seperti diatas karena masih tersisa disk submirror d0 & d10 (& OS
Solaris akhirnya masuk ke mode maintenance, ini yang gw lakukan:
1.Setelah masuk ke modus maintenance masuklah ke modus OBP, dengan command init 0 atau halt
2. Setelah ini di OK prompt ketikan OK boot cdrom -s (inget DVD/CD OS itu penting xixixixi)
3. Tunggu beberapa saat, setelah masuk ke mode single user, lakukan:
# fsck /dev/rdsk/c2t0d0s2
1.Setelah masuk ke modus maintenance masuklah ke modus OBP, dengan command init 0 atau halt
2. Setelah ini di OK prompt ketikan OK boot cdrom -s (inget DVD/CD OS itu penting xixixixi)
3. Tunggu beberapa saat, setelah masuk ke mode single user, lakukan:
# fsck /dev/rdsk/c2t0d0s2
- jesiesays:
haiyah…jadi nyampah…
Ted, apusin deh
Ted, apusin deh
10. Pingback: Kalo
Solaris Volume Manager error… « Jesie’s babbles
- untungsays:
ada lagi
cek juga make metaset, klo2 ntu server ternyata di cluster dengan server lain. dan make storage yg sama.
pengalaman berharga, on job training di pajak
cek juga make metaset, klo2 ntu server ternyata di cluster dengan server lain. dan make storage yg sama.
pengalaman berharga, on job training di pajak
- tedysays:
@ untung : thanks Tung infonya. Jadi apa detail
command & output dari metaset yang harus diperhatikan?
- untungsays:
detail command nya ya..tetep metaset
just make sure, jika yang mengakses disk/storage nya itu hanya satu server atau lebih dari satu server. jika dari metaset gak ada output apa2. berarti gak diset cluster secara volume manager. tp klo ada berarti musti cek juga ke server yg atu nya lagi.
just make sure, jika yang mengakses disk/storage nya itu hanya satu server atau lebih dari satu server. jika dari metaset gak ada output apa2. berarti gak diset cluster secara volume manager. tp klo ada berarti musti cek juga ke server yg atu nya lagi.
- tedysays:
@ untung : ok thanks infonya Tung
- mpssays:
sekalian di check metadb dan /etc/systemnya nya…
kalo2 masih ada. dan kalo ga perlu di delete ajja
biar gak ngacoin kalo mo diskswap hdd tersebut.
- tedysays:
@ mps : wah ada minijer kasih informasi juga nih
thanks Pak tambahan informasinya
- milsumirahcubsays:
itu kalo disknya dah rusak, juga kudu diganti aja
*nyampah mode is on*
- husnasays:
Gmn Ci kuq ga jls masa ga ad prosedur mlakukan
mnegement file pada OS linux,solaris,free bsd.WAA NDANDONG
- tedysays:
@ husna : what the hell are you talking about????
- shandysays:
Pak, klo replace failed disk di RAID 5 gmna ya..
saya sudah bikin se procedure nya tp lum yakin,
procedure saya adalah:
#cfgadm -al
#cfgadm -c unconfigure c:…
replace old disk dgn new disk
#cfgadm -c configure c:…
#metareplace -e volume_raid5 component
saya sudah bikin se procedure nya tp lum yakin,
procedure saya adalah:
#cfgadm -al
#cfgadm -c unconfigure c:…
replace old disk dgn new disk
#cfgadm -c configure c:…
#metareplace -e volume_raid5 component
Pertanyaan saya..apakah kita harus samakan
partisi nya dlu sebelum run metareplace ataukah partisi nya akan dilalukan oleh
OS pada saat resync?
Check Physical Network Cable Status
If we have remote server/computer with several network interfaces, sometime we will face network connection problem on certain interface. To check physical network cable status on Solaris we can use the following command :
1
2
|
# ndd
  -get /dev/fjgi link_status
1 |
By default it will read
fjgi0
first, to check another fjgi
interface we define the instance first then repeat the command
1
2
|
# ndd
  –set /dev/fjgi instance 2
# ndd
-get /dev/fjgi link_status |
ce
interfaces (Sun GigaSwift Ethernet 1.0 driver), we can’t use ndd command. But we have another option
by using kstat command :
root@drc-scp14# kstat -p ce | grep
link_up
ce:0:ce0:link_up
1
ce:1:ce1:link_up
1
ce:2:ce2:link_up
0
ce:3:ce3:link_up
0
ce:4:ce4:link_up
0
ce:5:ce5:link_up
1
root@drc-scp14# ifconfig -a
lo0: flags=1000849<up
,loopback,running,multicast,ipv4=""> mtu 8232 index 1
inet
127.0.0.1 netmask ff000000
ce0: flags=9040843</up><up
,broadcast,running,multicast,deprecated,ipv4,nofailover=""> mtu
1500 index 2
inet
10.22.248.141 netmask ffffff00 broadcast 10.22.248.255
groupname
scp-front
ether
0:14:4f:96:8c:96
ce0:1:
flags=1000843</up><up ,broadcast,running,multicast,ipv4="">
mtu 1500 index 2
inet
10.22.248.143 netmask ffffff00 broadcast 10.22.248.255
ce1: flags=9040843</up><up
,broadcast,running,multicast,deprecated,ipv4,nofailover=""> mtu
1500 index 3
inet
10.22.248.142 netmask ffffff00 broadcast 10.22.248.255
groupname
scp-front
ether
0:14:4f:68:6b:30
ce5: flags=1000843</up><up
,broadcast,running,multicast,ipv4=""> mtu 1500 index 5
inet
10.22.253.133 netmask fffffff0 broadcast 10.22.253.143
ether
0:14:4f:96:8c:97
ce2: flags=1000803</up><up
,broadcast,multicast,ipv4=""> mtu 1500 index 10
inet
10.22.255.133 netmask fffffff0 broadcast 10.22.255.143
ether
0:14:4f:68:6b:31
root@drc-scp14#
</up>
On Linux
system we do it like this :
1
2
3
4
|
[root@pwsupport-ftpserver tedy]#
mii-tool
eth0: negotiated 100baseTx-FD,
link ok
eth1: negotiated 100baseTx-FD,
link ok
[root@pwsupport-ftpserver tedy]#
|
Using mii-tool we can check spesific interface like this :
1
2
3
|
[root@pwsupport-ftpserver tedy]#
mii-tool eth0
eth0: negotiated 100baseTx-FD,
link ok
[root@pwsupport-ftpserver tedy]#
|
If there is
no cable plugged-in then the result would be like this :
1
2
3
|
ttirtawi@tedy-laptop:~$
sudomii-tool eth0
eth0: no link
ttirtawi@tedy-laptop:~$
|
Configure Boot Device On SUN Server With Solaris OS
On the Sun server with Solaris OS inside, boot device defined on thenvramrc which stored in the server’s nvram. We can see boot device setting
using eeprom command like
this :
1
2
3
|
bash-2.03#
  eeprom | grep boot-device
boot-device=disk
netbash-2.03# |
c1t0d0 (behave as
default boot device). To create an alias for the physical disk we use the nvalias command. To set the boot device
we can do it by setenv
command on OBP environment.
1
2
|
OK
  nvalias disk /pci@1f,700000/scsi@2/disk@0,0
OK setenv
boot-device disk |
nvram
from OS environment), to do that we can do by some command explained below.First we need to set parameter
use-nvramrc
as TRUE. This will let us configured boot device from the operating system :
1
2
3
4
5
6
7
|
bash-2.03#
  eeprom "use-nvramrc?=true"
bash-2.03#
eeprom | grep nvramuse-nvramrc?=truenvramrc=devalias
disk0 /pci@1f,700000/scsi@2/sd@0,0 devalias disk1
/pci@1f,700000/scsi@2/sd@1,0bash-2.03#
eeprom | grep boot-deviceboot-device=disk
netbash-2.03# |
1
2
3
4
5
6
7
8
9
10
|
bash-2.03#
  format
Searching
fordisks...doneAVAILABLE
DISK SELECTIONS: 0.
c1t0d0 <SUN146G cyl 14087 alt 2 hd 24 sec 848> /pci@1f,700000/scsi@2/sd@0,0 1.
c1t1d0 <SUN146G cyl 14087 alt 2 hd 24 sec 848> /pci@1f,700000/scsi@2/sd@1,0Specify
disk (enter its number): ^Dbash-2.03# |
1
2
3
4
5
6
7
8
9
10
11
12
13
14
|
bash-2.03#
eeprom "nvramrc=devalias disk0 /pci@1f,700000/scsi@2/disk@0,0 devalias
disk1 /pci@1f,700000/scsi@2/disk@1,0"bash-2.03#bash-2.03#
eeprom | grep aliasnvramrc=devalias
disk0 /pci@1f,700000/scsi@2/disk@0,0 devalias disk1
/pci@1f,700000/scsi@2/disk@1,0bash-2.03#bash-2.03#
eeprom | grep boot-deviceboot-device=disk
netbash-2.03#bash-2.03#
eeprom "nvramrc=devunalias disk"bash-2.03#
eeprom | grep boot-deviceboot-device=disk
netbash-2.03#
eeprom boot-device="disk0 disk1"bash-2.03#
eeprom | grep boot-deviceboot-device=disk0
disk1 |
disk1 or disk2. This configuration is mandatory to be done after
we configured mirroring of the boot disk. Because with the mirrored root disk,
sometime it might be needed to boot using 2nd disk when 1st disk degraded.
TAMBAH HARDISK,PARTSI DAN MOUNTING
Ini sebagai
contoh saja
# format
Searching for disks...done
AVAILABLE
  DISK SELECTIONS:
0. c0t0d0 <ST38410A cyl 16706 alt 2 hd 16 sec
63>
/pci@1f,0/pci@1,1/ide@3/dad@0,0
1. c1t3d0 <SUN9.0G cyl 4924 alt 2 hd 27 sec 133>
/pci@1f,0/pci@1/scsi@1/sd@3,0
Specify disk (enter its number):^D
#
# touch
/reconfigure àuntuk mendeteksi
hardisk baru
# init 5-> restart
Table
penamaan standarisasi partisi
Table 3-2 describes the terminology for
disk partitioning.
Table 3-2 Partition Table Terms and Usage
Term Description
Part The slice number. Valid slice numbers are 0 through 7.
Tag
The Tag
field is
historical
inmeaning
and not
used
anymore.
A value that indicates how the slice is
being used.
0 = unassigned
1 = boot
2 = root
3 = swap
4 = usr
5 = backup
6 = stand
8 = home
Veritas Volume Manager array tags:
14 = public (region)
15 = private (region)
Flag
The Flag
field is
historical
inmeaning
and not
used
anymore.
00 wm = The disk slice is writable and mountable.
01 wu = The disk slice is writable and unmountable. This is the
default state
of slices dedicated for swap areas.
10 rm = The disk slice is read-only and mountable.
11 ru = The disk slice is read-only and unmountable.
Cylinders The starting and ending cylinder number for the disk
slice.
Size The slice size: Mbytes (MB), Gbytes (GB), blocks (b), or cylinders (c).
Blocks
The total number of cylinders and the total number of sectors per slice.
Oke sekarang kita mulai
# format
Searching for disks...done
AVAILABLE DISK SELECTIONS:
0. c0t0d0 <ST38410A cyl 16706 alt 2 hd 16 sec
63>
/pci@1f,0/pci@1,1/ide@3/dad@0,0
1. c1t3d0 <SUN9.0G cyl 4924 alt 2 hd 27 sec 133>
/pci@1f,0/pci@1/scsi@1/sd@3,0
Specify
disk (enter its number): àpilih disk yang 0 atau 1
Specify disk (enter its number): 1
selecting c1t3d0
[disk
formatted]
FORMAT MENU:
disk - select a disk
type - select (define) a disk type
partition - select (define) a partition table
current - describe the current disk
format - format and analyze the disk
repair - repair a defective sector
label - write label to the disk
analyze - surface analysis
defect - defect list management
backup - search for backup labels
verify - read and display labels
save - save new disk/partition definitions
inquiry - show vendor, product and revision
scsi - independent SCSI mode selects
cache - enable, disable or query SCSI disk cache
volname - set 8-character volume name
!<cmd> - execute <cmd>, then return
Quit --à>>>>>>>
ini adalah commandnya
Untuk yang versi x86 gunakan perintah fdisk
Kita
pilih format
format> partition
PARTITION MENU:
0 - change ‘0’ partition
1 - change ‘1’ partition
2 - change ‘2’ partition
3 - change ‘3’ partition
4 - change ‘4’ partition
5 - change ‘5’ partition
6 - change ‘6’ partition
7 - change ‘7’ partition
select - select a predefined table
modify - modify a predefined partition table
name - name the current table
print - display the current table
label - write partition map and label to the disk
!<cmd> - execute <cmd>, then return
Quit
partition>
print ---à> untuk melihat hasil
konfigurasi
partition> print
Current partition table (original):
Total disk cylinders available: 4924 + 2 (reserved
cylinders)
Part Tag Flag Cylinders Size Blocks
0 unassigned wm 0 0 (0/0/0) 0
1 unassigned wm 0 0 (0/0/0) 0
2 backup ru 0 - 4923 8.43GB (4924/0/0) 17682084
3 unassigned wu 0 0 (0/0/0) 0
4 unassigned wm 0 0 (0/0/0) 0
5 unassigned wm 0 0 (0/0/0) 0
6 unassigned wu 0 0 (0/0/0) 0
7
unassigned wm 0 0 (0/0/0) 0
Kita mw buat partisi apa aja tinggal di pilih
Disini kita akan buat partisi 0,1 dan 7
partition> 0
Part
Tag Flag Cylinders Size Blocks
0
unassigned wm 0 0 (0/0/0) 0
Enter partition id tag[unassigned]: ?--à>ketik ? untuk melihat id tag nya
Expecting one of the following: (abbreviations ok):
unassigned
boot root swap
usr backup stand var
home alternates reserved
Enter partition id tag[unassigned]: home-à>kita pilih home
Enter partition permission flags[wm]: ?-à>>ketik tanda ? untuk melihat flags nya
Expecting one of the following: (abbreviations ok):
wm - read-write, mountable
wu - read-write, unmountable
rm - read-only, mountable
ru - read-only, unmountable
Enter partition permission flags[wm]: wm
Enter new starting cyl[1]:-à>>>ketik
1 sampai 200
Enter partition size[0b, 0c, 1e, 0.00mb, 0.00gb]:
400mbà saya isi 400 mb “bebas bias di isi brapa aja”
partition> print ---àuntuk melihat
hasilnya
Current partition table (unnamed):
Total disk cylinders available: 3836 + 2 (reserved
cylinders)
Part
Tag Flag Cylinders Size Blocks
0 home
wm 1 - 200
400.00MB (200/0/0) 819200 ----à>ini hasilnya
size 400 mb
1 unassigned wm
0 0 (0/0/0) 0
2 backup
wu 0 - 3835 7.49GB (3836/0/0) 15712256
3
unassigned wm 0 0 (0/0/0) 0
4
unassigned wm 0 0 (0/0/0) 0
5
unassigned wm 0 0 (0/0/0) 0
6
unassigned wm 0 0 (0/0/0) 0
7
unassigned wm 0 0 (0/0/0) 0
8 boot
wu 0 - 0
2.00MB (1/0/0) 4096
9
unassigned wm 0 0 (0/0/0) 0
Kita buat lagi partition 1
partition> 1
Part
Tag Flag Cylinders Size Blocks
1
unassigned wm 0 0 (0/0/0) 0
Enter partition id tag[unassigned]: ?
Expecting one of the following: (abbreviations ok):
unassigned boot root swap
usr backup stand var
home alternates reserved
Enter partition id tag[unassigned]: swap
Enter partition permission flags[wm]: wm
Enter new starting cyl[1]:201--à>karena yang partiti 0 itu sampai dengan 200
Enter partition size[0b, 0c, 1e, 0.00mb, 0.00gb]:
200mb
partition> print
Current partition table (unnamed):
Total disk cylinders available: 3836 + 2 (reserved
cylinders)
Part Tag
Flag Cylinders Size Blocks
0
home wm 1 -
200 400.00MB (200/0/0)
819200
1
swap wm 201 -
300 200.00MB (100/0/0)
409600
2
backup wu 0 - 3835 7.49GB (3836/0/0) 15712256
3 unassigned wm
0 0 (0/0/0) 0
4 unassigned
wm 0 0 (0/0/0) 0
5 unassigned wm
0 0 (0/0/0) 0
6 unassigned wm
0 0 (0/0/0) 0
7 unassigned wm
0 0 (0/0/0) 0
8
boot wu 0 -
0 2.00MB (1/0/0) 4096
9 unassigned wm
0 0 (0/0/0) 0
Kita buat partisi 7
partition>
7
Part Tag
Flag Cylinders Size Blocks
7 unassigned wm
0 0 (0/0/0) 0
Enter
partition id tag[unassigned]: ?
Expecting
one of the following: (abbreviations ok):
unassigned boot
root swap
usr backup stand var
home alternates reserved
Enter
partition id tag[unassigned]: alternates
Enter
partition permission flags[wm]: wm
Enter new
starting cyl[1]: 301
Enter partition
size[0b, 0c, 301e, 0.00mb, 0.00gb]: 400mb
partition>
print--à
untuk melihat hasilnya
Current
partition table (unnamed):
Total disk
cylinders available: 3836 + 2 (reserved cylinders)
Part Tag
Flag Cylinders Size Blocks
0
home wm 1 -
200 400.00MB (200/0/0)
819200
1
swap wm 201 -
300 200.00MB (100/0/0)
409600
2
backup wu 0 - 3835 7.49GB (3836/0/0) 15712256
3 unassigned wm
0 0 (0/0/0) 0
4 unassigned wm
0 0 (0/0/0) 0
5 unassigned wm
0 0 (0/0/0) 0
6 unassigned wm
0 0
(0/0/0) 0
7 alternates wm
301 - 500 400.00MB (200/0/0)
819200
8
boot wu 0 -
0 2.00MB (1/0/0) 4096
9 unassigned wm
0 0 (0/0/0) 0
partition>
label--à>untuk
save hasil konfigurasi yang telah kita buat
Ready to
label disk, continue? Y
partition>
print
Current
partition table (unnamed):
Total disk
cylinders available: 3836 + 2 (reserved cylinders)
Part Tag
Flag Cylinders Size Blocks
0
home wm 1 -
200 400.00MB (200/0/0)
819200
1
swap wm 201 -
300 200.00MB (100/0/0)
409600
2
backup wu 0 - 3835 7.49GB (3836/0/0) 15712256
3 unassigned wm
0 0 (0/0/0) 0
4 unassigned wm
0 0 (0/0/0) 0
5 unassigned wm
0 0 (0/0/0) 0
6 unassigned wm
0 0
(0/0/0) 0
7 alternates wm
301 - 500 400.00MB (200/0/0)
819200
8
boot wu 0 -
0 2.00MB (1/0/0) 4096
9 unassigned wm
0 0 (0/0/0) 0
Mounting
Sebelum di
mounting hardisk baru
bash-3.00#
df -k
Filesystem kbytes used
avail capacity Mounted on
rpool/ROOT/s10_0910 65544192 3757343 60179876 6%
/
/devices 0 0
0 0% /devices
ctfs 0 0
0 0% /system/contract
proc 0 0
0 0% /proc
mnttab 0 0
0 0% /etc/mnttab
swap 1012312 352 1011960 1%
/etc/svc/volatile
objfs 0 0
0 0% /system/object
sharefs 0 0
0 0% /etc/dfs/sharetab
/usr/lib/libc/libc_hwcap1.so.1
63937220 3757343
60179876 6% /lib/libc.so.1
fd 0 0
0 0% /dev/fd
swap 1012040 80 1011960 1%
/tmp
swap 1011988 28 1011960 1%
/var/run
rpool/export 65544192 23 60179876 1%
/export
rpool/export/home 65544192 21 60179876 1%
/export/home
rpool 65544192 32 60179876 1%
/rpool
lalu gunakan perintah
buat folder
baru
caranya :
#mkdir
/rahman--àuntuk
buat folder baru dan terserah namanya
#newfs /dev/rdsk/c1t1d0s0
ànewfs
==perintah parsisi di kenal
à/dev
==partisinya ada di folder dev
à/rdsk ==rawdisk
àc1t1d0s0
==partisi 0
Tampilannya
sperti ini
bash-3.00#
newfs /dev/rdsk/c1t1d0s0
newfs:
construct a new file system /dev/rdsk/c1t1d0s0: (y/n)? y
/dev/rdsk/c1t1d0s0: 819200 sectors in 200 cylinders of 128
tracks, 32 sectors
400.0MB in 13 cyl groups (16 c/g,
32.00MB/g, 15360 i/g)
super-block
backups (for fsck -F ufs -o b=#) at:
32, 65600, 131168, 196736, 262304, 327872,
393440, 459008, 524576, 590144,
655712, 721280, 786848
Lalu
ketikan
#mount
/dev/dsk/c1t1d0s0 /rahman-----àmounting partisi 0 di directory rahman
Untuk
mounting partisi 1 dan 7 caranya sama seperti diatas
Yang perlu
di rubah hanya folder mounting nya
Klo di
partisi 0
mkdir
/rahman
klo di
partisi 1
buat lagi
foldernya jangan sampai sama
sebagai
contoh
mkdir
/rahman2
untuk yang
selanjutnya sama seperti diatas
Oprek
solaris
Ngoprek Sun Solaris dan OpenSolaris
Iseng-iseng utak-atik Solaris
Membuat Bootable OpenSolaris CD
Artikel berikut menyajikan secara sederhana cara membuat bootable OpenSolaris CD. Bootable CD ini bukan sebuah live CD atau distro lengkap berbasis OpenSolaris. Bootable CD ini akan menjalankan program instalasi Solaris Express. Bootable CD ini diharapkan bisa menjadi prototype live CD atau distro lengkap berbasis OpenSolaris.Membuat ISO Image
Persiapkan DVD Solaris Express dan masukan ke dalam DVD drive. Gunakansetup_install_server script untuk
menyalin boot image, kernel dan file-file pendukung lainnya.# cd /media/SOL_11_X86/Solaris_11/Tools
# mkdir /export/bootstrap
# ./setup_install_server -b /export/bootstrap
Verifying target directory...
Calculating space required for the installation boot image
Copying Solaris_11 Tools hierarchy...
Copying Install Boot Image hierarchy...
Copying /boot x86 netboot hierarchy...
Install Server setup completeKita telah memiliki filesystem image lengkap untuk sebuah prototype OpenSolaris CD installer. Paket-paket software
SUNWcsr dan SUNWcsu
yang telah dibuat sebelum akan ditambahkan.# cd /export/bootstrap
# ls -aF
./ .install_config/ Solaris_11/
../ .slicemapfile boot/
# cd Solaris_11
# mkdir Docs ExtraValue Misc Patches Product # Agar mirip dengan layout DVD Solaris distribusi
# cd Product
# mkdir SUNWcsr SUNWcsuMenyalin
SUNWcsr dan SUNWcsu paket dari direktori /var/spool/pkg# cd /var/spool/pkg/SUNWcsr
# find . -depth -print | cpio -pvdm /export/bootstrap/Solaris_11/Product/SUNWcsr
# cd /var/spool/pkg/SUNWcsu
# find . -depth -print | cpio -pvdm /export/bootstrap/Solaris_11/Product/SUNWcsuTotal ukuran image secara keseluruhan adalah,
# cd /export
# du -sk bootstrap
224194 bootstrap
Asumsikan image telah siap, berikutnya adalah membuat bootable ISO image.
Bootable ISO imagenya bernama Solaris11.iso# cd /
# mkdir /aux0/isoimages
# mkisofs -o /aux0/isoimages/Solaris11.iso -b boot/grub/stage2_eltorito \
-c .catalog -no-emul-boot -boot-load-size 4 \
-boot-info-table -relaxed-filenames -N -L -l -r -J \
-d -D -V Solaris_11 /export/bootstrap
mkisofs: The option '-L' is reserved by POSIX.1-2001.
mkisofs: The option '-L' means 'follow all symbolic links'.
mkisofs: Mkisofs-2.02 will introduce POSIX semantics for '-L'.
mkisofs: Use -allow-leading-dots in future to get old mkisofs behavior.
Warning: creating filesystem that does not conform to ISO-9660.
...
4.40% done, estimate finish Tue May 29 15:07:05 2007
8.80% done, estimate finish Tue May 29 15:07:05 2007
13.20% done, estimate finish Tue May 29 15:07:05 2007
17.60% done, estimate finish Tue May 29 15:07:05 2007
21.99% done, estimate finish Tue May 29 15:07:05 2007
26.40% done, estimate finish Tue May 29 15:07:05 2007
30.79% done, estimate finish Tue May 29 15:07:05 2007
35.20% done, estimate finish Tue May 29 15:07:05 2007
39.59% done, estimate finish Tue May 29 15:07:05 2007
43.99% done, estimate finish Tue May 29 15:07:05 2007
48.40% done, estimate finish Tue May 29 15:07:07 2007
52.79% done, estimate finish Tue May 29 15:07:05 2007
57.19% done, estimate finish Tue May 29 15:07:07 2007
61.59% done, estimate finish Tue May 29 15:07:07 2007
65.98% done, estimate finish Tue May 29 15:07:07 2007
70.39% done, estimate finish Tue May 29 15:07:07 2007
74.78% done, estimate finish Tue May 29 15:07:08 2007
79.19% done, estimate finish Tue May 29 15:07:06 2007
83.58% done, estimate finish Tue May 29 15:07:08 2007
87.98% done, estimate finish Tue May 29 15:07:06 2007
92.38% done, estimate finish Tue May 29 15:07:06 2007
96.78% done, estimate finish Tue May 29 15:07:06 2007
Total translation table size: 2048
Total rockridge attributes bytes: 216195
Total directory bytes: 2052096
Path table size(bytes): 13206
Max brk space used 1f8000
113672 extents written (222 MB)
Mengetes ISO Image Files
# /usr/sbin/lofiadm -a /aux0/isoimages/Solaris11.iso
/dev/lofi/1
# mount -F hsfs /dev/lofi/1 /mnt
# cd /mnt
# ls -aF
./ ../ .catalog .install_config/ .slicemapfile Solaris_11/ boot/Bootable ISO image telah siap. Untuk membakar imagenya bisa dengan Nero di Microsoft Windows atau
cdrecordReferensi Lain:
http://www.sun.com/bigadmin/features/articles/device_driver_install.htmlMembuat Distribusi Paket Solaris
Paket (Package) adalah sebuah standard distribusi software di Solaris. Paket terdiri dari: cpio file yangterkompresi, pre/post install script, package info (pkginfo) file dan package map (pkgmap). Berikut adalah contoh direktori paket:
$ cd /media/SOL_11_X86/Solaris_11/Product/SUNWcsr
$ ls -l
total 80
dr-xr-xr-x 2 root root 2048 Jan 13 07:12 archive
dr-xr-xr-x 2 root root 8192 Jan 13 07:12 install
-r--r--r-- 1 root root 903 Jan 6 02:19 pkginfo
-r--r--r-- 1 root root 27458 Jan 6 02:19 pkgmap
dr-xr-xr-x 6 root root 2048 Jan 13 07:12 relocPaket akan dibuat dari konsolidasi terkompilasi ON (Operating System and Networking), yang dikenal dengan BFU. Tutorial ini tidak menyuguhkan detail proses mengkompilasi OpenSolaris dari kode sumbernya. Distribusi yang dibuat dari BFU bukan merupakan sebuah distribusi lengkap sebuah system operasi tapi bisa digunakan untuk mengupgrade kernel dan core Solaris software yang telah terinstall.
1. Mempersiapkan ON Image
Direktori kerja yang dipakai dalam contoh berikut adalah /aux0/on-bfu-intel untuk menyimpan archive, image dan struktur direktori paket dari distribusi ON BFU. ON BFU archive adalah tar archive yang terdiri dari 2 file yaitu:- on-bfu-20070423.i386.tar.bz2
- on-closed-bins-20070423.i386.tar.bz2
$ cd /aux0/on-bfu-intel
$ ls
on-bfu-20070423.i386.tar.bz2 on-closed-bins-20070423.i386.tar.bz2
$ bzcat on-bfu-20070423.i386.tar.bz2 | tar xf -
$ bzcat on-closed-bins-20070423.i386.tar.bz2 | tar xf -
$ cd archives-20070423/i386
$ ls
conflict_resolution.gz generic.lib generic.sbin i86pc.boot i86pc.usr
generic.kernel generic.root generic.usr i86pc.rootEkstrak archive file-filenya,
$ cpio -ivcd < generic.kernel
$ cpio -icd < generic.lib
$ cpio -icd < generic.root
$ cpio -icd < generic.sbin
$ cpio -icd < generic.usr
$ cpio -icd < i86pc.boot
$ cpio -icd < i86pc.root
$ cpio -icd < i86pc.usrAbaikan dulu file conflict_resolution.gz dan hapus archive file-filenya,
$ rm conflict_resolution.gz
$ rm generic.* i86pc.* conflict_resolution.cpio
$ ls -F
bin@ devices/ home/ mnt/ proc/ tmp/
boot/ etc/ kernel/ opt/ sbin/ usr/
dev/ export/ lib/ platform/ system/ var/Total ukuran image,
$ du -sk .
307252 .Berikutnya uppdate ON image dengan menambahkan file-file biner dari closed archive,
$ cd /aux0/on-bfu-intel/closed/root_i386
$ find . -depth -print | cpio -pvdm /aux0/on-bfu-intel/archives-20070423/i386Abaikan beberapa pesan kesalahan yang muncul ketika cpio mencoba mengupdate image. Pesan yang muncul:
cpio: Existing "/aux0/on-bfu-intel/archives-20070423/i386/kernel/drv/pcser" same age or newerSeharusnya ukuran image akan lebih besar,
$ cd /aux0/on-bfu-intel/archives-20070423/i386
$ du -sk .
312529 .
2. Membuat Package
ON image akan dibuat dalam 2 paket software:- SUNWcsu yang berisi semua file di dalam /usr directory
- SUNWcsr yang berisi semua file dalam / kecuali /usr directory dan /opt/SUNWdtrt
2.a. Membuat Paket SUNWcsu
Persiapkan direktory paket untuk SUNWcsu,$ mkdir /aux0/on-bfu-intel/package/SUNWcsu/usrBerikutnya menyalin usr image ke direktori SUNWcsu,
$ cd /aux0/on-bfu-intel/archives-20070423/i386/usr
$ find . -depth -print | cpio -pvdm /aux0/on-bfu-intel/package/SUNWcsu/usrMembuat prototype file,
$ cd /aux0/on-bfu-intel/package/SUNWcsu/usr
$ pkgproto . > prototypeEdit prototype file untuk menyesuaikan ownership dan permission
$ vi prototype
f none usr/bin/getent 0555 root bin
f none usr/bin/fsstat 0555 root bin
f none usr/bin/dumpcs 0555 root bin
f none usr/bin/sortbib 0555 root bin
f none usr/bin/uucp 4511 root binPersiapkan file-file berikut: pkginfo, copyright dan pre/post install script. Dalam contoh ini kita hanya menyalin file-file yang diperlukan dari DVD distribusi Solaris Express.
$ cd /media/SOL_11_X86/Solaris_11/Product/SUNWcsu
$ cp pkginfo /aux0/on-bfu-intel/package/SUNWcsu
$ cd /media/SOL_11_X86/Solaris_11/Product/SUNWcsu/install
$ cp copyright i.none postinstall /aux0/on-bfu-intel/package/SUNWcsuAkhirnya kita dapatkan struktur direktori yang diperlukan untuk membuat paket SUNWcsu,
$ cd /aux0/on-bfu-intel/package/SUNWcsu
$ ls -F
copyright pkginfo prototype i.none postinstall usr/Edit prototype file untuk memasukan copyright, pkginfo, dan pre/post install script, tambahkan 5 baris berikut di awal file:
$ vi prototype
# Packaging files
i pkginfo
i copyright
i postinstall
i i.noneSaatnya untuk membuat SUNWcsu paket sesuai dengan ketentuan yang dibuat dalam prototype file,
$ pkgmk -f ./prototype -r .
.....
/var/spool/pkg/SUNWcsu/reloc/usr/xpg4/include/curses.h
/var/spool/pkg/SUNWcsu/reloc/usr/xpg4/include/term.h
/var/spool/pkg/SUNWcsu/reloc/usr/xpg4/include/unctrl.h
...Setelah beberapa saat paket SUNWcsu selesai dibuat. Paket tersebut dapat ditemukan di:
# pwd
/var/spool/pkg/SUNWcsu
# ls -l
total 1814
drwxr-xr-x 2 onuser staff 512 May 13 10:53 install
-rw-r--r-- 1 onuser staff 511 May 13 10:53 pkginfo
-rw-r--r-- 1 onuser staff 917032 May 13 10:53 pkgmap
drwxr-xr-x 3 onuser staff 512 May 13 10:53 reloc
Lakukan penyesuain ownership file-file paketnya:# chown root:other install pkginfo pkgmap reloc
# cd install
# chown root *
# ls -l
total 20
-rw-r--r-- 1 root staff 93 May 13 09:11 copyright
-rw-r--r-- 1 root staff 7332 May 13 09:11 i.none
-rw-r--r-- 1 root staff 220 May 13 09:11 postinstall
# chgrp other i.none
# ls -l
total 20
-rw-r--r-- 1 root staff 93 May 13 09:11 copyright
-rw-r--r-- 1 root other 7332 May 13 09:11 i.none
-rw-r--r-- 1 root staff 220 May 13 09:11 postinstall
# cd ../reloc
# chown -R root:other usr
# cd ..Persiapkan direktori archive untuk menampung cpio archive dari paket ini,
# mkdir archive
# chgrp -R other archiveBuat cpio archive dari file-file yang berada di reloc dan diberi name none,
# cd reloc
# find . -depth -print | cpio -ov -C 512 -O ../archive/none
# bzip2 ../archive/none
# cd ../archive
# ls -l
total 116180
drwxr-xr-x 2 root other 512 May 13 11:13 ./
drwxr-xr-x 5 onuser staff 512 May 13 11:08 ../
-rwxr-xr-x 1 root root 57M May 13 11:11 none.bz2*
# chmod 644 none.bz2
# chgrp other none.bz2
# ls -l
total 116180
drwxr-xr-x 2 root other 512 May 13 11:13 ./
drwxr-xr-x 5 onuser staff 512 May 13 11:08 ../
-rw-r--r-- 1 root other 57M May 13 11:11 none.bz2
Hapus file-file yang ada di direktori reloc tapi biarkan struktur direktori
tetap ada,# cd ../reloc
# find . -depth -print > removed_files
# rm `cat removed_files`
# rm removed_files
2.b. Membuat Paket SUNWcsr
Berikut disajikan secara singkat langkah-langkah membuat paket SUNWcsr dari ON Image yang sama.$ cd /aux0/on-bfu-intel/archives-20070423/i386
$ mkdir /aux0/on-bfu-intel/package/SUNWcsr
$ find . -depth -print | cpio -pvdm /aux0/on-bfu-intel/package/SUNWcsrHapus direktori-direktori yang tidak diperlukan di dalam direktori paket,
$ cd /aux0/on-bfu-intel/package/SUNWcsr
$ m -r usr opt/SUNWdtrtMembuat prototype file,
$ cd /aux0/on-bfu-intel/package/SUNWcsr
$ pkgproto . > prototype
$ vi prototype # Change ownership and permissionMenyalin copyright, installation script dari DVD Distribusi Solaris Express,
$ cd /media/SOL_11_X86/Solaris_11/Product/SUNWcsr/install
$ cp * /aux0/on-bfu-intel/package/SUNWcsr
$ cd /aux0/on-bfu-intel/package/SUNWcsrAkhirnya kita dapatkan struktur direktori lengkap untuk paket SUNWcsr
$ ls -F
bin@ i.etcrpc i.pamconf kernel/
boot/ i.fstypes i.passwd lib/
checkinstall i.group i.pkcs11confbase mnt/
copyright i.hosts i.policyconf opt/
dev/ i.inetdconf i.preserve pkginfo
devices/ i.initd i.rbac platform/
etc/ i.inittab i.renamenew postinstall
export/ i.locallogin i.renameold preinstall
home/ i.localprofile i.rmmconf preremove
i.cronroot i.logadmconf i.services proc/
i.definit i.logindevperm i.shadow prototype
i.deflogin i.mailxrc i.syslogconf r.manifest
i.defpasswd i.manifest i.tiservices r.rbac
i.defsu i.netconfig i.ttydefs sbin/
i.dhcpinittab i.none i.ttysrch system/
i.etcprofile i.nscd i.vfstab tmp/
i.etcremote i.nsswitch i.voldconf var/Lakukan penyesuaian permission untuk installation scripts,
$ chmod 644 i.*
$ chmod 644 r.*
$ chmod 644 checkinstall postinstall preinstall preremove copyrightEdit prototype file untuk memasukan copyright, pkginfo, dan installation scripts yang diperlukan,
$ vi prototype
# packaging files
i pkginfo
i copyright
i checkinstall
i postinstall
i preinstall
i preremove
i i.inittab
i i.preserve
i i.renamenew
i i.tiservices
i i.inetdconf
i i.definit
i i.cronroot
i i.passwd
i i.shadow
i i.etcremote
i i.nsswitch
i i.nscd
i i.netconfig
i i.none
i i.deflogin
i i.defsu
i i.syslogconf
i i.ttysrch
i i.group
i i.etcrpc
i i.etcprofile
i i.mailxrc
i i.voldconf
i i.rmmconf
i i.initd
i i.locallogin
i i.localprofile
i i.logadmconf
i i.fstypes
i i.pamconf
i i.services
i i.rbac
i r.rbac
i i.renameold
i i.dhcpinittab
i i.policyconf
i i.pkcs11confbase
i i.defpasswd
i i.vfstab
i i.manifest
i r.manifest
i i.ttydefs
f none prototype 0644 root root
d none kernel 0755 root sys
...Saatnya untuk membuat SUNWcsr paket sesuai dengan ketentuan yang dibuat dalam prototype file,
$ pkgmk -f prototype -r .
## Building pkgmap from package prototype file.
.....
/var/spool/pkg/SUNWcsr/reloc/var/yp/Makefile
/var/spool/pkg/SUNWcsr/reloc/var/yp/aliases
## Validating control scripts.
## Packaging complete.Setelah beberapa saat paket SUNWcsu selesai dibuat. Paket tersebut dapat ditemukan di:
# cd /var/spool/pkg/SUNWcsr
# ls -l
total 326
drwxr-xr-x 2 onuser staff 1024 May 13 15:46 install
-rw-r--r-- 1 onuser staff 813 May 13 15:45 pkginfo
-rw-r--r-- 1 onuser staff 155170 May 13 15:45 pkgmap
drwxr-xr-x 9 onuser staff 512 May 13 15:46 reloc
Lakukan penyesuain ownership file-file paketnya:# chown -R root:other *
# ls -al
total 330
drwxr-xr-x 4 onuser staff 512 May 13 15:45 .
drwxrwxrwt 10 root bin 512 May 13 15:45 ..
drwxr-xr-x 2 root other 1024 May 13 15:46 install
-rw-r--r-- 1 root other 813 May 13 15:45 pkginfo
-rw-r--r-- 1 root other 155170 May 13 15:45 pkgmap
drwxr-xr-x 9 root other 512 May 13 15:46 reloc
# cd ..
# chown -R root:other SUNWcsr
# ls -al
total 330
drwxr-xr-x 4 root other 512 May 13 15:45 .
drwxrwxrwt 10 root bin 512 May 13 15:45 ..
drwxr-xr-x 2 root other 1024 May 13 15:46 install
-rw-r--r-- 1 root other 813 May 13 15:45 pkginfo
-rw-r--r-- 1 root other 155170 May 13 15:45 pkgmap
drwxr-xr-x 9 root other 512 May 13 15:46 relocMemeriksa keutuhan struktur paket,
# pkgchk -d . SUNWcsr
Checking uninstalled directory format package from
## Checking control scripts.
## Checking package objects.
## Checking is complete.Persiapkan direktori archive untuk menampung cpio archive dari paket ini,
# cd /var/spool/pkg/SUNWcsr
# mkdir archive
# ls -l
total 328
drwxr-xr-x 2 root root 512 May 13 15:58 archive
drwxr-xr-x 2 root other 1024 May 13 15:46 install
-rw-r--r-- 1 root other 813 May 13 15:45 pkginfo
-rw-r--r-- 1 root other 155170 May 13 15:45 pkgmap
drwxr-xr-x 9 root other 512 May 13 15:46 reloc
# chown -R root:other archiveBuat cpio archive dari file-file yang berada di reloc dan diberi name none,
# cd reloc
# find . -depth -print | cpio -ov -C 512 -O ../archive/none
# cd /var/spool/pkg/SUNWcsr/archive
# bzip2 none
# ls -l
total 77700
drwxr-xr-x 2 root other 512 May 13 16:04 ./
drwxr-xr-x 5 root other 512 May 13 15:58 ../
-rwxr-xr-x 1 root root 38M May 13 16:02 none.bz2*
# chown root:other none.bz2
# chmod 644 none.bz2
# ls
total 77700
drwxr-xr-x 2 root other 512 May 13 16:04 ./
drwxr-xr-x 5 root other 512 May 13 15:58 ../
-rw-r--r-- 1 root other 38M May 13 16:02 none.bz2Hapus file-file yang ada di direktori reloc tapi biarkan struktur direktori tetap ada,
# cd /var/spool/pkg/SUNWcsr/reloc
# find . -depth -print > removed_files
# rm `cat removed_files`
3. Menginstall Paket SUNWcsr dan SUNWcsu
Sekarang saatnya untuk mengetest apakah paket yang telah dibuat dapat terinstall seperti yang diharapkan.Agar instalasi berjalan tidak interaktif digunakan admin file yang telah dimodifikasi sebagai berikut,# cd /var/spool/pkg
# cp -p /var/sadm/install/default .
# vi default
mail=
instance=unique
partial=nocheck
runlevel=nocheck
idepend=nocheck
rdepend=nocheck
space=nocheck
setuid=nocheck
conflict=nocheck
action=nocheck
networktimeout=60
networkretries=3
authentication=quit
keystore=/var/sadm/security
proxy=
basedir=defaultPaket-paket ini akan diinstall di /aux0/rootdir,
# mkdir /aux0/rootdir
# pkgadd -a ./default -d . -R /aux0/rootdir SUNWcsr
Processing package instance from
Core Solaris, (Root)(i386) 11.11,REV=2007.05.06.07.38
Copyright 2006 Sun Microsystems, Inc. All rights reserved.
Use is subject to license terms.
## Executing checkinstall script.
Using as the package base directory.
## Processing package information.
## Processing system information.
Installing Core Solaris, (Root) as
## Executing preinstall script.
## Installing part 1 of 1.
/aux0/rootdir/bin
/aux0/rootdir/boot/solaris/bin/root_archive
/aux0/rootdir/dev/stderr
...
# pkgadd -a ./default -d . -R /aux0/rootdir SUNWcsu
Processing package instance from
Core Solaris, (Usr)(sparc) 11.10.0,REV=2005.01.21.15.53
Copyright 2005 Sun Microsystems, Inc. All rights reserved.
Use is subject to license terms.
This appears to be an attempt to install the same architecture and
version of a package which is already installed. This installation
will attempt to overwrite this package.
Using as the package base directory.
## Processing package information.
## Processing system information.
12676 package pathnames are already properly installed.
Installing Core Solaris, (Usr) as
## Installing part 1 of 1.
## Executing postinstall script.
Installation of was successful.
#
Referensi Lain:
http://www.opensolaris.org/os/community/on/gate_info/svr_packaging.pdf
Mengkompilasi dan Membuat Konsolidasi ON Build 65
Sistem yang akan digunakan untuk mengkompilasi ON adalah sebuah Notebook Intel Core Duo 1.73 GHz, 512 RAM yang terinstall Solaris Express Developer Edition 2/07 dan Sun Studio 11. Direktori kerja yang digunakan adalah /aux0 sebesar 29 GB.Mendownload Kode Sumber ON dan Tool
Dalam artikel ini digunakan ON build 65, file-file yang diperlukan adalah:- on-src-b65.tar.bz2
- SUNWonbld-b65.i386.tar.bz2
- on-closed-bins-b65.i386.tar.bz2
# cd /export/download
# ls
SUNWonbld-b65.i386.tar.bz2 on-src-b65.tar.bz2
on-closed-bins-b65.i386.tar.bz2
Menginstall ON Development Tool
Instalasi ON Developement Tool dilakukan oleh root,# bzcat SUNWonbld-b65.i386.tar.bz2 | tar xf -
# cd onbld
# pkgadd -d . SUNWonbld
Processing package instance from
## Installing package in global zone
...
Installing OS-Net Build Tools as
## Installing part 1 of 1.
/opt/onbld/bin/Install
/opt/onbld/bin/SampleLinks
/opt/onbld/bin/SamplePkgLinks
/opt/onbld/bin/acr
...
Membuat User Account dan Direktori Kerjanya
Buatlah sebuah user account yang akan melakukan proses kompilasi ON dari kode sumbernya. User account ini menggunakanUID=144780 dan GID=10 (staff), ini sesuai dengan UID/GID dari pemilik file-file yang terdapat dalam file kode sumber ON (on-src-b65.tar.bz2 archive).
# useradd -u 144780 -g staff -d /export/home/onuser -m -s /bin/ksh onuserBuat direktori kerja untuk onuser
# mkdir /aux0/testws1
# chown -R onuser:staff /aux0/testws1
Mengekstrak file kode sumber, closed binary dan Mengkompilasinya
Proses ekstraksi dan kompilasi dilakukan oleh onuser.# su - onuser
$ cd /aux0/testws1
$ bzcat on-src-b65.tar.bz2 | tar xf -
$ bzcat on-closed-bins-b65.i386.tar.bz2 | tar xf -
$ ls -F
README.opensolaris on-closed-bins-b65.i386.tar.bz2* usr/
SUNWonbld-b65.i386.tar.bz2* on-src-b65.tar.bz2*
closed/ onbld/
Modifikasi file initialisasi .profile untuk mengupdate variable PATH
dan MANPATH,$ cd /export/home/onuser
$ vi .profile
MAIL=/usr/mail/${LOGNAME:?}
PATH=/usr/bin:/usr/sbin:/usr/ccs/bin:/usr/dt/bin:/usr/openwin/bin:/opt/onbld/bin:/opt/onbld/i386:\
/usr/sfw/bin
MANPATH=/usr/dt/man:/usr/man:/usr/openwin/share/man:/usr/X11/share/man:/opt/onbld/man:/usr/sfw/man:\
/opt/SUNWspro/man
DISPLAY=:0.0
export PATH MANPATH DISPLAY
$ . $HOME/.profileBerikutnya, menyalin ON-specific environment file, yaitu opensolaris.sh dan memodifikasinya. Variabel-variable yang perlu diubah adalah GATE, emMGR_WS, STAFFER, VERSION. Variable NIGHTLY_OPTION saya tambahkan option -p agar selesai kompilasi langsung dibuatkan SVR4 paketnya.
$ cd /aux0/testws1
$ ls usr/src/tools/env
Makefile developer.sh gatekeeper.sh opensolaris.sh
$ cp usr/src/tools/env/opensolaris.sh .
$ chmod u+x opensolaris.sh
$ vi opensolaris.sh
...
NIGHTLY_OPTIONS="-pFNnaCDlmrt"
GATE=testws1
CODEMGR_WS=/aux0/$GATE
STAFFER=onuser
VERSION=$GATEJalankan perintah nightly untuk memulai proses kompilasi. File-file hasil kompilasi akan disimpan di direktori proto/root_i386 sedangkat paket software di packages/i386/nightly
$ nightly ./opensolaris.shSelama proses kompilasi sebuah log file dibuat. Log file ini berguna untuk melihat dan memonitor proses kompilasi. Buka terminal baru dan jalankan,
$ tail -f /aux0/testws1/log/nightly.log
==== Nightly distributed build started: Thu May 31 11:09:34 WIT 2007 ====
==== list of environment variables ====
_=/usr/bin/env
ENVCPPFLAGS2=
TMPDIR=/tmp/nightly.tmpdir.1631
...
==== Nightly distributed build started: Thu May 31 11:09:34 WIT 2007 ====
==== Nightly distributed build completed: Thu May 31 13:53:06 WIT 2007 ====
==== Total build time ====
real 2:43:32
Melihat Hasil Kompilasi dan Log Kesalahan
Hasil kompilasi terdapat di /aux0/testws1/proto/root_i386,$ cd /aux0/testws1/proto/root_i386
$ ls
bin dev etc home lib opt proc system usr
boot devices export kernel mnt platform sbin tmp varSoftware Paket yang berhasil dibuat akan tersimpan di /aux0/testws1/packages/i386/nightly,
$ cd /aux0/testws1/packages/i386/nightly
$ ls
BRCMbnx SUNWftpu SUNWonzfs SUNWscpr
SUNW1394 SUNWfwdc SUNWopenssl-commands SUNWscpu
SUNW1394h SUNWfwdcu SUNWopenssl-include SUNWscsa1394
SUNWaac SUNWgrub SUNWopenssl-libraries SUNWses
SUNWaccr SUNWgrubS SUNWopenssl-man SUNWsi3124
SUNWaccu SUNWgss SUNWopensslr SUNWslpr
....Pesan-pesan kesalahan dapat dianalisa dari beberapa file yang terdapat di /aux0/testws1/log/log.2007-05-31,
$ cd /aux0/testws1/log/log.2007-05-31
$ ls
mail_msg nightly.log proto_list_i386
Memahami Proses Instalasi Solaris
Memahami Proses Instalasi Solaris 10
Instalasi Solaris 10 SPARC dan X86/64 pada dasarnya akan melalui tahapan proses yang sama. Artikel ini berisi penjelasan sederhana tahap-tahap instalasi Solaris 10 dan informasi yang harus disediakan di setiap tahap instalasi. Proses instalasi Solaris 10 terbagi menjadi 4 tahap:- Tahap boot dan mengkonfigurasi program instalasi
- Tahap identifikasi sistem
- Tahap konfigurasi sistem
- Tahap ekstraksi dan menyalin paket distribusi Solaris 10 ke disk
Konfigurasi Perangkat Keras
Proses instalasi dalam artikel ini menggunakan media DVD Solaris 10 SPARC 11/06 dan komputer Sun Blade 1000. Konfigurasi komputer yang digunakan diperlihatkan pada tampilan berikut:{0} ok banner
SUNW,Sun-Blade-1000 (2 X UltraSPARC-III) , No Keyboard
Copyright 1998-2004 Sun Microsystems, Inc. All rights reserved.
OpenBoot 4.13.0, 2048 MB memory installed, Serial #16456776.
Ethernet address 8:0:20:fb:1c:48, Host ID: 80fb1c48.Akses ke komputer yang akan diinstall dilakukan melalui koneksi serial dari komputer lain yang sudah terinstall Solaris 10. Koneksi serial dilakukan dari program terminal CDE, yaitu
dtterm,
dengan perintah tip. Artikel
ini menyajikan secara berurutan tampilan yang muncul pada layar konsole di
setiap bagian tahap instalasi.Tahap Boot dan Mengkonfigurasi Program Instalasi
Pada komputer berarsitektur SPARC proses boot ke media DVD Solaris 10 dimulai dengan mengetikan perintahboot
cdrom ketika sistem masih ada di level Boot PROM. Melalui
perintah ini Boot PROM program akan menjalankan boot program yang terdapat di
DVD. Boot program selanjutnya akan mengaktifkan program kernel seperti
diperlihatkan pada tampilan berikut. Untuk komputer X86, lakukan perubahan
parameter urutan boot di BIOS agar komputer boot ke CDROM/DVD.{0} ok boot cdrom
Boot device: /pci@8,700000/scsi@6/disk@6,0:f File and args:
SunOS Release 5.10 Version Generic_118833-33 64-bit
Copyright 1983-2006 Sun Microsystems, Inc. All rights reserved.
Use is subject to license terms.
Configuring devices.
Using RPC Bootparams for network configuration information.
Attempting to configure interface hme0...
SUNW,eri0 : 100 Mbps full duplex link up
WARNING: hme0: fault detected in device; service degraded
WARNING: hme0: No response from Ethernet network : Link down -- cable problem?
Skipped interface hme0
Attempting to configure interface eri0...
Skipped interface eri0
internal error: Bad file number
svc:/system/filesystem/local:default: WARNING: /usr/sbin/zfs mount -a failed: exit status 134
Dec 11 18:31:11 svc.startd[7]: svc:/system/filesystem/local:default: Method "/lib/svc/method/fs-local"
failed with exit status 95.
Dec 11 18:31:11 svc.startd[7]: system/filesystem/local:default failed fatally:
transitioned to maintenance (see 'svcs -xv' for details)
Setting up Java. Please wait...
Beginning system identification...
Searching for configuration file(s)...
Search complete.
Discovering additional network configuration...Tahap Boot selesai setelah program kernel, program-program untuk perangkat keras dan program-program pendukung kernel lainnya tersedia di memory komputer. Berikutnya program kernel akan mengaktifkan program
svc.startd dan svc.startd mengaktifkan program
instalasi yang disebut install-begin.
Konfigurasi awal yang diperlukan oleh program instalasi adalah bahasa
pengantar dan tipe terminal yang akan digunakan, seperti
diperlihatkan pada tampilan berikut:Select a Language
0. English
1. French
2. German
3. Italian
4. Japanese
5. Korean
6. Simplified Chinese
7. Spanish
8. Swedish
9. Traditional Chinese
Please make a choice (0 - 9), or press h or ? for help: 0
What type of terminal are you using?
1) ANSI Standard CRT
2) DEC VT52
3) DEC VT100
4) Heathkit 19
5) Lear Siegler ADM31
6) PC Console
7) Sun Command Tool
8) Sun Workstation
9) Televideo 910
10) Televideo 925
11) Wyse Model 50
12) X Terminal Emulator (xterms)
13) CDE Terminal Emulator (dtterm)
14) Other
Type the number of your choice and press Return: 13Setelah informasi konfigurasi dasar terpenuhi maka akan tampil antar muka program instalasi Solaris untuk pertama kali. Tampilan pada layar konsole menjelaskan bahwa proses instalasi terbagi menjadi beberapa bagian dan bagaimana bekerja dengan program instalasi
Solaris Installation Program
The Solaris installation program is divided into a series of short sections
where you'll be prompted to provide information for the installation. At
the end of each section, you'll be able to change the selections you've
made before continuing.
About navigation...
- The mouse cannot be used
- If your keyboard does not have function keys, or they do not
respond, press ESC; the legend at the bottom of the screen
will change to show the ESC keys to use for navigation.
F2_Continue F6_Help
Tahap Identifikasi
Tahap identifikasi dimulai dengan menjalankan program instalasi yang disebut denganinstall-begin.
Tampilan yang muncul pertama kali pada tahap ini adalah seperti berikut ini: Identify This System
On the next screens, you must identify this system as networked or
non-networked, and set the default time zone and date/time.
If this system is networked, the software will try to find the information
it needs to identify your system; you will be prompted to supply any
information it cannot find.
> To begin identifying this system, press F2.
F2_Continue F6_HelpInformasi-informasi yang diperlukan pada tahap ini digunakan untuk mengkonfigurasi hal-hal berikut:
Koneksi jaringan.
Informasi ini akan menentukan
apakah komputer terhubung ke jaringan atau tidak dan bagaimana komputer
terkonfigurasi untuk terhubung ke jaringan.
Layanan Kerberos.
Informasi ini untuk menentukan
layanan otentikasi yang akan digunakan ketika pengguna mengakses sistem
komputer. Ada 2 layanan otentikasi yang tersedia yaitu Kerberos dan UNIX
standar.
Name Service.
Name service berfungsi untuk
menyediakan layangan informasi jaringan yang meliputi DNS, NIS, NIS+ dan LDAP.
Zona waktu.
Zona waktu akan menentukan
selisih waktu antar negara
Jam dan tanggal.
Sesuaikan ketepatan jam dan
tanggal komputer dengan standar waktu yang berlaku
Kata sandi untuk root.
Kata sandi digunakan untuk
melindungi akses ke root sebagai sistem administrator
Layanan jaringan.
Untuk lebih menjamin keamanan
komputer sangat dianjurkan untuk menonaktifkan layanan jaringan seperti telnet,
ftp, rsh atau rlogin. Jika diperlukan akses ke komputer dari komputer lain
sebaiknya hanya menggunakan SSH.
Detail informasi yang diperlukan untuk mengkonfigurasi koneksi jaringan
meliputi: - Memilih kartu jaringan yang akan dipakai
- Apakah akan menggunakan DHCP untuk menyediakan alamat IP
- Menentukan nama komputer
- Menentukan alamat IP dan netmask jika tidak menggunakan DHCP
- Apakah akan mengaktifkan IPv6
- Menentukan konfigurasi routing
Konfigurasi Koneksi Jaringan
Network Connectivity
Specify Yes if the system is connected to the network by one of the Solaris
or vendor network/communication Ethernet cards that are supported on the
Solaris CD. See your hardware documentation for the current list of
supported cards.
Specify No if the system is connected to a network/communication card that
is not supported on the Solaris CD, and follow the instructions listed under
Help.
Networked
---------
[X] Yes
[ ] No
F2_Continue F6_HelpJika konfigurasi perangkat keras komputer memiliki lebih dari satu kartu jaringan maka akan muncul tampilan berikut:
Configure Multiple Network Interfaces
Multiple network interfaces have been detected on this system. Specify all
of the network interfaces you want to configure.
Note: You must choose at least one interface to configure.
Network interfaces
------------------
[X] eri0
[ ] hme0
Esc-2_Continue Esc-6_HelpSelama tahap mengkonfigurasi koneksi jaringan pada layar konsole muncul tampilan-tampilan berikut ini:
Konfigurasi DHCP
DHCP for eri0
Specify whether or not this network interface should use DHCP to configure
itself. Choose Yes if DHCP is to be used, or No if the network interface is
to be configured manually.
NOTE: DHCP support will not be enabled, if selected, until after the system
reboots.
Use DHCP for eri0
-----------------
[ ] Yes
[X] No
Esc-2_Continue Esc-6_Help
Menentukan Nama Komputer
Host Name for eri0
Enter the host name which identifies this system on the network. The name
must be unique within your domain; creating a duplicate host name will cause
problems on the network after you install Solaris.
A host name must have at least one character; it can contain letters,
digits, and minus signs (-).
Host name for eri0 leopard
Esc-2_Continue Esc-6_Help
Menentukan IP Address
IP Address for eri0
Enter the Internet Protocol (IP) address for this network interface. It
must be unique and follow your site's address conventions, or a
system/network failure could result.
IP addresses contain four sets of numbers separated by periods (for example
129.200.9.1).
IP address for eri0 192.168.1.1
Esc-2_Continue Esc-6_Help
Menentukan Netmask
Subnet for eri0
On this screen you must specify whether this system is part of a subnet. If
you specify incorrectly, the system will have problems communicating on the
network after you reboot.
> To make a selection, use the arrow keys to highlight the option and
press Return to mark it [X].
System part of a subnet
-----------------------
[X] Yes
[ ] No
Esc-2_Continue Esc-6_Help
Netmask for eri0
On this screen you must specify the netmask of your subnet. A default
netmask is shown; do not accept the default unless you are sure it is
correct for your subnet. A netmask must contain four sets of numbers
separated by periods (for example 255.255.255.0).
Netmask for eri0 255.255.255.0
Esc-2_Continue Esc-6_Help
Aktivasi IPv6
IPv6 for eri0
Specify whether or not you want to enable IPv6, the next generation Internet
Protocol, on this network interface. Enabling IPv6 will have no effect if
this machine is not on a network that provides IPv6 service. IPv4 service
will not be affected if IPv6 is enabled.
> To make a selection, use the arrow keys to highlight the option and
press Return to mark it [X].
Enable IPv6 for eri0
--------------------
[ ] Yes
[X] No
Esc-2_Continue Esc-6_Help
Menentukan Konfigurasi Routing
Set the Default Route for eri0
To specify the default route, you can let the software try to detect one
upon reboot, you can specify the IP address of the router, or you can choose
None. Choose None if you do not have a router on your subnet.
> To make a selection, use the arrow keys to select your choice and press
Return to mark it [X].
Default Route for eri0
-----------------------
[X] Detect one upon reboot
[ ] Specify one
[ ] None
Esc-2_Continue Esc-6_HelpSetelah semua informasi yang diperlukan untuk mengkonfigurasi koneksi jaringan terpenuhi maka diakhiri oleh tampilan konfirmasi seperti
berikut ini:
Confirm Information for eri0
> Confirm the following information. If it is correct, press F2;
to change any information, press F4.
Networked: Yes
Use DHCP: No
Host name: leopard
IP address: 192.168.1.1
System part of a subnet: Yes
Netmask: 255.255.255.0
Enable IPv6: No
Default Route: Detect one upon reboot
Esc-2_Continue Esc-4_Change Esc-6_Help
Mengkonfigurasi Kerberos
Configure Security Policy:
Specify Yes if the system will use the Kerberos security mechanism.
Specify No if this system will use standard UNIX security.
Configure Kerberos Security
---------------------------
[ ] Yes
[X] No
Esc-2_Continue Esc-6_Help
Confirm Information
> Confirm the following information. If it is correct, press F2;
to change any information, press F4.
Configure Kerberos Security: No
Esc-2_Continue Esc-4_Change Esc-6_Help
Memilih Name Service
Name Service
On this screen you must provide name service information. Select the name
service that will be used by this system, or None if your system will either
not use a name service at all, or if it will use a name service not listed
here.
> To make a selection, use the arrow keys to highlight the option
and press Return to mark it [X].
Name service
------------
[ ] NIS+
[ ] NIS
[ ] DNS
[ ] LDAP
[X] None
Esc-2_Continue Esc-6_Help
Confirm Information
> Confirm the following information. If it is correct, press F2;
to change any information, press F4.
Name service: None
Esc-2_Continue Esc-4_Change Esc-6_Help
Memilih Zona Waktu
Time Zone
On this screen you must specify your default time zone. You can specify a
time zone in three ways: select one of the continents or oceans from the
list, select other - offset from GMT, or other - specify time zone file.
> To make a selection, use the arrow keys to highlight the option and
press Return to mark it [X].
Continents and Oceans
----------------------------------
- [ ] Africa
x [ ] Americas
x [ ] Antarctica
x [ ] Arctic Ocean
x [X] Asia
x [ ] Atlantic Ocean
x [ ] Australia
x [ ] Europe
v [ ] Indian Ocean
Esc-2_Continue Esc-6_Help
Country or Region
> To make a selection, use the arrow keys to highlight the option and
press Return to mark it [X].
Countries and Regions
------------------------
^ [ ] Georgia
x [ ] Hong Kong
x [ ] India
x [X] Indonesia
x [ ] Iran
x [ ] Iraq
x [ ] Israel
x [ ] Japan
x [ ] Jordan
x [ ] Kazakhstan
x [ ] Korea (North)
x [ ] Korea (South)
v [ ] Kuwait
Esc-2_Continue Esc-6_Help
Time Zone
> To make a selection, use the arrow keys to highlight the option and
press Return to mark it [X].
Time zones
-----------------------------------------------------------------
[X] Java & Sumatra
[ ] west & central Borneo
[ ] east & south Borneo, Celebes, Bali, Nusa Tengarra, west Timor
[ ] Irian Jaya & the Moluccas
Esc-2_Continue Esc-6_Help
Menyesuaikan Jam dan Tanggal
Date and Time
> Accept the default date and time or enter
new values.
Date and time: 2007-12-12 10:10
Year (4 digits) : 2007
Month (1-12) : 12
Day (1-31) : 12
Hour (0-23) : 10
Minute (0-59) : 10
Esc-2_Continue Esc-6_Help
Confirm Information
> Confirm the following information. If it is correct, press F2;
to change any information, press F4.
Time zone: Java & Sumatra
(Asia/Jakarta)
Date and time: 2007-12-12 10:10:00
Esc-2_Continue Esc-4_Change Esc-6_Help
Menentukan Kata Sandi root
Root Password
Please enter the root password for this system.
The root password may contain alphanumeric and special characters. For
security, the password will not be displayed on the screen as you type it.
> If you do not want a root password, leave both entries blank.
Root password: ******
Root password: ******
Esc-2_Continue Esc-6_Help
Aktivasi Layanan Jaringan
Enabling remote services
Would you like to enable network services for use by remote clients?
Selecting "No" provides a more secure configuration in
which Secure Shell is the only network service provided to
remote clients. Selecting "Yes" enables a larger set of
services as in previous Solaris releases. If in doubt, it is
safe to select "No" as any services can be individually enabled
after installation.
Note: This choice only affects initial installs. It doesn't affect upgrades.
Remote services enabled
-----------------------
[X] Yes
[ ] No
F2_Continue F6_Help
Tahap Konfigurasi System
Setelah tahap identifikasi selesai berikutnya instalasi memasuki tahap konfigurasi. Tahap konfigurasi dimulai dengan menjalankan program instalasi yang disebut denganinstall-solaris.
Tampilan yang muncul pertama kali pada tahap ini adalah seperti berikut ini:System identification complete.
Starting Solaris installation program...
Executing JumpStart preinstall phase...
Searching for SolStart directory...
Checking rules.ok file...
Using begin script: install_begin
Using finish script: patch_finish
Executing SolStart preinstall phase...
Executing begin script "install_begin"...
Begin script install_begin execution completed.Informasi-informasi terpenting yang diperlukan pada tahap ini digunakan untuk mengkonfigurasi hal-hal berikut:
Tipe distribusi software instalasi
Ada 2 tipe distribusi software
Solaris untuk instalasi yaitu distribusi package-based
Solaris, disebut sebagai distribusi standar,
dan Flash Archive. Distribusi standar merupakan
metode distribusi software yang digunakan oleh DVD instalasi Solaris 10. Flash
archive merupakan salinan cpio (archive) dari sebuah komputer yang
sudah terinstal Solaris 10.
Tipe instalasi
Tipe instalasi ada 2 yaitu
instalasi perbaharui atau inisial. Instalasi perbaharui dimungkinkan jika
komputer telah terinstal Solaris sebelum versi Solaris 10. Instalasi ini akan
memperbaharui file-file tertentu dan membiarkan file-file lain tidak
diperbaharui. Sebaliknya instalasi inisial akan menggantikan seluruh file yang
ada di disk dengan file-file yang ada di media distribusi.
Bahasa dan locale
Bahasa akan menentukan bahasa
pengantar yang akan digunakan sedangkan locale untuk menentukan antara lain
format bilangan dan format mata uang.
Software group
Software group akan menentukan
berapa ruang disk yang diperlukan untuk menginstal Solaris sesuai dengan fungsi
dari sistem komputer. Untuk komputer server dianjurkan untuk memilih software
group Entire Distribution atau Entire plus OEM support Distribution
sedangkan komputer desktop cukup dengan software group Developer System Support atau End User System Support. Software
group Core System Support atau Reduced Networking Core System Support
biasanya digunakan untuk komputer yang memerlukan instalasi minimal dengan
pertimbangn keamanan sistem.
Disk dan layout partisi
Ruang disk minimal yang
diperlukan untuk instalasi Solaris 10 adalah 4341 MB dengan layout partisi
minial adalah root dan swap.
Tampilan pada layar konsole terminal selama tahap konfigurasi diperlihatkan
secara berurutan pada bagian berikut ini.Memilih Tipe Distribusi Instalasi Software
Solaris Interactive Installation
On the following screens, you can accept the defaults or you can customize
how Solaris software will be installed by:
- Selecting the type of Solaris software to install
- Selecting disks to hold software you've selected
- Selecting unbundled products to be installed with Solaris
- Specifying how file systems are laid out on the disks
After completing these tasks, a summary of your selections (called a profile) will be displayed.
There are two ways to install your Solaris software:
- "Standard" installs your system from a standard Solaris Distribution.
Selecting "Standard" allows you to choose between initial install
and upgrade, if your system is upgradable.
- "Flash" installs your system from one or more Flash Archives.
F2_Standard F4_Flash F5_Exit F6_Help
Penanganan DVD Media
Eject a CD/DVD Automatically?
During the installation of Solaris software, you may be using one or more
CDs/DVDs. You can choose to have the system eject each CD/DVD automatically
after it is installed or you can choose to manually eject each CD/DVD.
[X] Automatically eject CD/DVD
[ ] Manually eject CD/DVD
F2_Continue F3_Go Back F5_Exit
Mengaktifkan reboot setelah instalasi
Reboot After Installation?
After Solaris software is installed, the system must be rebooted. You can
choose to have the system automatically reboot, or you can choose to
manually reboot the system if you want to run scripts or do other
customizations before the reboot. You can manually reboot a system by using
the reboot(1M) command.
[X] Auto Reboot
[ ] Manual Reboot
F2_Continue F3_Go Back F5_Exit
Memilih Tipe Instalasi
Solaris Interactive Installation
This system is upgradable, so there are two ways to install the Solaris
software.
The Upgrade option updates the Solaris software to the new release, saving
as many modifications to the previous version of Solaris software as
possible. Back up the system before using the Upgrade option.
The Initial option overwrites the system disks with the new version of
Solaris software. This option allows you to preserve any existing file
systems. Back up any modifications made to the previous version of Solaris
software before starting the Initial option.
After you select an option and complete the tasks that follow, a summary of
your actions will be displayed.
F2_Upgrade F3_Go Back F4_Initial F5_Exit F6_Help
Initializing
The system is being initialized.
Loading install media, please wait...
Menyetujui Lisensi Software
License
- Sun Microsystems, Inc. ("Sun")
x SOFTWARE LICENSE AGREEMENT
x
x READ THE TERMS OF THIS AGREEMENT ("AGREEMENT") CAREFULLY BEFORE
x OPENING SOFTWARE MEDIA PACKAGE. BY OPENING SOFTWARE MEDIA
x PACKAGE, YOU AGREE TO THE TERMS OF THIS AGREEMENT. IF YOU ARE
x ACCESSING SOFTWARE ELECTRONICALLY, INDICATE YOUR ACCEPTANCE OF
x THESE TERMS BY SELECTING THE "ACCEPT"(OR EQUIVALENT) BUTTON AT
x THE END OF THIS AGREEMENT. IF YOU DO NOT AGREE TO ALL OF THE
x TERMS, PROMPTLY RETURN THE UNUSED SOFTWARE TO YOUR PLACE OF
x PURCHASE FOR A REFUND OR, IF SOFTWARE IS ACCESSED ELECTRONICALLY,
x SELECT THE "DECLINE" (OR EQUIVALENT) BUTTON AT THE END OF THIS
x AGREEMENT. IF YOU HAVE SEPARATELY AGREED TO LICENSE TERMS
x ("MASTER TERMS") FOR YOUR LICENSE TO THIS SOFTWARE, THEN SECTIONS
x 1-6 OF THIS AGREEMENT ("SUPPLEMENTAL LICENSE TERMS") SHALL
x SUPPLEMENT AND SUPERSEDE THE MASTER TERMS IN RELATION TO THIS
x SOFTWARE.
x
v 1. Definitions.
F2_Accept License F5_Exit
Memilih Tambahan Bahasa
Select Geographic Regions
Select the geographic regions for which support should be installed.
> [ ] Australasia
> [ ] Asia
> [ ] Eastern Europe
> [ ] Northern Europe
> [ ] Northern Africa
> [ ] Middle East
> [ ] Southern Europe
> [ ] South America
> [ ] Central America
> [ ] Central Europe
> [ ] North America
> [ ] Western Europe
Move left, right, up, down using the arrow keys
F2_Continue F3_Go Back F5_Exit F6_Help
Select Geographic Regions
Select the geographic regions for which support should be installed.
> [ ] Southern Europe
> [ ] South America
> [ ] Central America
> [ ] Central Europe
V [/] North America
[ ] Canada-English (ISO8859-1)
[ ] Canada-French (ISO8859-1)
[ ] French
[ ] Mexico (ISO8859-1)
[ ] Spanish
[X] U.S.A. (UTF-8)
[X] U.S.A. (en_US.ISO8859-1)
> [ ] Western Europe
Locale is selected. Press Return to deselect
F2_Continue F3_Go Back F5_Exit F6_Help
Memilih Locale
Select System Locale
Select the initial locale to be used after the system has been installed.
[X] POSIX C ( C )
North America
[ ] U.S.A. (UTF-8) ( en_US.UTF-8 )
[ ] U.S.A. (en_US.ISO8859-1) ( en_US.ISO8859-1 )
[ ] U.S.A. (en_US.ISO8859-15) ( en_US.ISO8859-15 )
F2_Continue F3_Go Back F5_Exit F6_Help
Memilih Software Tambahan
Select Products
Select the products you would like to install.
V [ ] Solaris 10 Extra Value Software................. 0.00 MB
[ ] Sun Validation Test Suite 6.3................... 69.92 MB
Press Return to hide components
F2_Continue F3_Go Back F4_Product Info F5_Exit F6_Help
Additional Products
To scan for additional products, select the location you wish to scan.
Products found at the selected location that are in a Web Start Ready
install form will be added to the Products list.
Web Start Ready product scan location:
[X] None
[ ] CD/DVD
[ ] Network File System
F2_Continue F3_Go Back F5_Exit
Memilih Software Group
Select Software
Select the Solaris software to install on the system.
NOTE: After selecting a software group, you can add or remove software by
customizing it. However, this requires understanding of software
dependencies and how Solaris software is packaged.
[X] Entire Distribution plus OEM support ....... 5619.00 MB
[ ] Entire Distribution ........................ 5578.00 MB
[ ] Developer System Support ................... 5464.00 MB
[ ] End User System Support .................... 4448.00 MB
[ ] Core System Support ........................ 857.00 MB
[ ] Reduced Networking Core System Support ..... 806.00 MB
F2_Continue F3_Go Back F4_Customize F5_Exit F6_Help
Memilih Disk
Select Disks
On this screen you must select the disks for installing Solaris software.
Start by looking at the Suggested Minimum field; this value is the
approximate space needed to install the software you've selected. Keep
selecting disks until the Total Selected value exceeds the Suggested Minimum
value.
NOTE: ** denotes current boot disk
Disk Device Available Space
=============================================================================
[X] c1t1d0 17269 MB (F4 to edit)
[ ] c1t2d0 17269 MB
Total Selected: 17269 MB
Suggested Minimum: 4341 MB
F2_Continue F3_Go Back F4_Edit F5_Exit F6_Help
Melindungi Data Partisi Tertentu
Preserve Data?
Do you want to preserve existing data? At least one of the disks you've
selected for installing Solaris software has file systems or unnamed slices
that you may want to save.
F2_Continue F3_Go Back F4_Preserve F5_Exit F6_Help
Menentukan Layout Partisi dan File System
Automatically Layout File Systems?
Do you want to use auto-layout to automatically layout file systems?
Manually laying out file systems requires advanced system administration
skills.
F2_Auto Layout F3_Go Back F4_Manual Layout F5_Exit F6_Help
Automatically Layout File Systems
On this screen you must select all the file systems you want auto-layout to
create, or accept the default file systems shown.
NOTE: For small disks, it may be necessary for auto-layout to break up some
of the file systems you request into smaller file systems to fit the
available disk space. So, after auto-layout completes, you may find file
systems in the layout that you did not select from the list below.
File Systems for Auto-layout
========================================
[X] /
[ ] /opt
[ ] /usr
[ ] /usr/openwin
[ ] /var
[X] swap
F2_Continue F5_Cancel F6_Help
File System and Disk Layout
The summary below is your current file system and disk layout, based on the
information you've supplied.
NOTE: If you choose to customize, you should understand file systems, their
intended purpose on the disk, and how changing them may affect the operation
of the system.
File sys/Mnt point Disk/Slice Size
========================================================================
/ c1t1d0s0 5294 MB
swap c1t1d0s1 513 MB
overlap c1t1d0s2 17269 MB
/export/home c1t1d0s7 11462 MB
F2_Continue F3_Go Back F4_Customize F5_Exit F6_Help
Customize Disk: c1t1d0
Boot Device: c1t1d0s0
Entry: Recommended: MB Minimum: MB
================================================================================
Slice Mount Point Size (MB)
0 / 10001
1 swap 1026
2 overlap 17269
3 0
4 0
5 0
6 0
7 0
================================================================================
Capacity: 17269 MB
Allocated: 11027 MB
Free: 6242 MB
F2_OK F4_Options F5_Cancel F6_Help
>File System and Disk Layout
The summary below is your current file system and disk layout, based on the
information you've supplied.
NOTE: If you choose to customize, you should understand file systems, their
intended purpose on the disk, and how changing them may affect the operation
of the system.
File sys/Mnt point Disk/Slice Size
========================================================================
/ c1t1d0s0 10001 MB
swap c1t1d0s1 1026 MB
overlap c1t1d0s2 17269 MB
F2_Continue F3_Go Back F4_Customize F5_Exit F6_Help
Mengaktifkan NFS Mount
Mount Remote File Systems?
Do you want to mount software from a remote file server? This may be
necessary if you had to remove software because of disk space problems.
F2_Continue F3_Go Back F4_Remote Mounts F5_Exit F6_Help
Konfirmasi Konfigurasi System
Profile
The information shown below is your profile for installing Solaris software.
It reflects the choices you've made on previous screens.
============================================================================
Installation Option: Initial
Boot Device: c1t1d0
Client Services: None
Locales: U.S.A. (UTF-8)
U.S.A. (en_US.ISO8859-1)
System Locale: C ( C )
Software: Solaris 10, Entire Distribution plus OEM su
File System and Disk Layout: / c1t1d0s0 10001 MB
swap c1t1d0s1 1026 MB
F2_Begin Installation F4_Change F5_Exit F6_HelpTampilan berikut memperlihatkan munculnya peringatan karena tidak semua silinder disk digunakan ketika mempartisi disk. Dari contoh di atas, adanya silinder yang tidak digunakan (unused disk space) sengaja dilakukan dan akan dimanfaatkan nanti setelah proses instalasi selesai.
Warning
The following disk configuration condition(s) have been
detected. Errors must be fixed to ensure a successful
installation. Warnings can be ignored without causing the
installation to fail.
WARNING: Unused disk space (c1t1d0)
WARNING: CHANGING DEFAULT BOOT DEVICE
You have either explicitly changed the default boot device, or
accepted the default to "Reconfigure EEPROM". In either case,
the system's EEPROM will be changed so it will always boot
Solaris from the device that you've specified. If this is not
what you had in mind, go back to the disk selection screens and
change the "Reconfigure EEPROM" setting.
F2_OK F5_CancelBagian akhir dari tahap konfigurasi adalah mempartisi disk, mengkonfigurasi disk label dan membuat sistem file UFS di masing-masing partisi seperti diperlihatkan tampilan berikut ini.
Configuring disk (c1t1d0)
- Creating Solaris disk label (VTOC)
Creating and checking UFS file systems
- Creating / (c1t1d0s0)
Warning: 1032 sector(s) in last cylinder unallocated
/dev/rdsk/c1t1d0s0: 20483064 sectors in 3334 cylinders of 48 tracks, 128 sectors
10001.5MB in 209 cyl groups (16 c/g, 48.00MB/g, 5824 i/g)
super-block backups (for fsck -F ufs -o b=#) at:
32, 98464, 196896, 295328, 393760, 492192, 590624, 689056, 787488, 885920,
19563424, 19661856, 19760288, 19858720, 19957152, 20055584, 20154016,
20252448, 20350880, 20449312
Tahap Ekstraksi Paket Distribusi Solaris dan Menyalin ke Disk
Paket distribusi standar Solaris 10 dalam DVD Solaris 10 sebenarnya dalam format salinan cpio yang terkompresi bzip2. Tahap ekstrasi paket distribusi Solaris 10 dan menyalinya ke disk membutuhkan waktu yang cukup lama. Tampilan berikut memperlihatkan progres selama tahap ekstraksi dan penyalinan.Solaris Initial Install
MBytes Installed: 245,16
MBytes Remaining: 3312,67
Installing: JDK 5.0
| | | | | |
0 20 40 60 80 100Tahap akhir dari tahap ini ditandai dengan munculnya pesan “Solaris 10 software installation succeeded” seperti diperlihatkan tampilan berikuti ini.
Solaris 10 software installation succeeded
Customizing system files
- Mount points table (/etc/vfstab)
- Unselected disk mount points (/var/sadm/system/data/vfstab.unselected)
- Network host addresses (/etc/hosts)
- Network host addresses (/etc/hosts)
- Environment variables (/etc/default/init)
Cleaning devices
Customizing system devices
- Physical devices (/devices)
- Logical devices (/dev)
Installing boot information
- Installing boot blocks (c1t1d0s0)
- Installing boot blocks (/dev/rdsk/c1t1d0s0)
- Updating system firmware for automatic rebooting
Installation log location
- /a/var/sadm/system/logs/install_log (before reboot)
- /var/sadm/system/logs/install_log (after reboot)
Installation complete
Executing SolStart postinstall phase...
Executing finish script "patch_finish"...
Finish script patch_finish execution completed.
Executing JumpStart postinstall phase...
The begin script log 'begin.log'
is located in /var/sadm/system/logs after reboot.
The finish script log 'finish.log'
is located in /var/sadm/system/logs after reboot.
Launching installer. Please Wait...
Installing Additional Software
|-1%--------------25%-----------------50%-----------------75%--------------100%|
Pausing for 30 seconds at the "Summary" screen. The wizard will continue to
the next step unless you select "Pause". Enter 'p' to pause. Enter 'c' to
continue. [c]
Pausing for 90 seconds at the "Reboot" screen. The wizard will continue to
the next step unless you select "Pause". Enter 'p' to pause. Enter 'c' to
continue. [c]
syncing file systems... done
rebooting...
Resetting ...
Reboot Setalah Instalasi Selesai
SUNW,Sun-Blade-1000 (2 X UltraSPARC-III) , No Keyboard
Copyright 1998-2004 Sun Microsystems, Inc. All rights reserved.
OpenBoot 4.13.0, 2048 MB memory installed, Serial #16456776.
Ethernet address 8:0:20:fb:1c:48, Host ID: 80fb1c48.
Rebooting with command: boot
Boot device: /pci@8,600000/SUNW,qlc@4/fp@0,0/disk@w21000004cf0b1daf,0:a File and args:
SunOS Release 5.10 Version Generic_118833-33 64-bit
Copyright 1983-2006 Sun Microsystems, Inc. All rights reserved.
Use is subject to license terms.
Hostname: leopard
SUNW,eri0 : 100 Mbps full duplex link up
Configuring devices.
Loading smf(5) service descriptions: 42/143
Loading smf(5) service descriptions: 143/143
Creating new rsa public/private host key pair
Creating new dsa public/private host key pair
This system is configured with NFS version 4, which uses a domain
name that is automatically derived from the system's name services.
The derived domain name is sufficient for most configurations. In a
few cases, mounts that cross different domains might cause files to
be owned by "nobody" due to the lack of a common domain name.
Do you need to override the system's default NFS version 4 domain
name (yes/no) ? [no] :
For more information about how the NFS version 4 default domain
name is derived and its impact, refer to the man pages for nfs(4)
and nfsmapid(1m), and the System Administration Guide: Network
Services.
Dec 12 11:32:25 leopard sendmail[828]: My unqualified host name (leopard) unknown; sleeping for retry
leopard console login: Dec 12 11:33:25 leopard sendmail[828]: unable to qualify my own domain name (leopard) -- using short name
Dec 12 11:33:25 leopard sendmail[948]: My unqualified host name (leopard) unknown; sleeping for retry
Dec 12 11:33:25 leopard sendmail[949]: My unqualified host name (leopard) unknown; sleeping for retry
Dec 12 11:33:57 leopard java[1286]: pkcs11_softtoken: Keystore version failure.
Dec 12 11:34:25 leopard sendmail[948]: unable to qualify my own domain name (leopard) -- using short name
Dec 12 11:34:25 leopard sendmail[949]: unable to qualify my own domain name (leopard) -- using short name
leopard console login: root
Password:
Dec 12 11:34:34 leopard login: ROOT LOGIN /dev/console
Sun Microsystems Inc. SunOS 5.10 Generic January 2005
#
CARA SETTING AUTO BOOT
1.DARI OK PROMPT
#OK PRINTENVà>>CEK
AUTO-BOOT
#OK KETIK setenv auto-boot? True
DAN
2.DARI OS
ROOT#EEPROMà>>CEK
AUTO-BOOT
ROOT# EEPROM auto-boot? True
TENTANG
ILOM
CLI Command Quick Reference
This section contains
the most common ILOM commands used to administer your Sun server from the
command-line interface (CLI).
Using the cd Command
Use the cd command to navigate the namespace.
When you cd to a target
location, that location then becomes the default target for all other commands.
Using the
-default option with no target returns you to the top of the namespace. Typing
cd -default is the equivalent of typing cd /. Typing just cd displays your current location in the namespace. Typing help targets displays a list of all targets in the entire namespace.
-default option with no target returns you to the top of the namespace. Typing
cd -default is the equivalent of typing cd /. Typing just cd displays your current location in the namespace. Typing help targets displays a list of all targets in the entire namespace.
Syntax
Options
Targets and Properties
Examples
To create a user named emmett, cd
to /SP/users, then execute the
create command with /SP/users
as the default target.
-> cd /SP/users

-> create emmett
-> cd /SP/users
Using the create Command
Use the create command to set up an object in the
namespace. Unless you specify properties with the create command, they are empty.
Syntax
Options
Targets, Properties, and Values
Example
-> create /SP/users/susan role=administrator
Using the delete Command
Use the delete command to remove an object from
the namespace. You will be prompted to confirm a delete command. Eliminate this prompt by using the
-script option.
-script option.
Syntax
Options
Targets
Examples
-> delete /SP/users/susan

-> delete /SP/services/snmp/communities/public
Using the exit Command
Syntax
Options
Using the help Command
Use the help command to display Help information
about commands and targets. Using the -o|output
terse option displays usage information only.
The -o|output verbose option displays usage, description, and additional information including examples of command usage. If you do not use the
-o|output option, usage information and a brief description of the command are displayed.
The -o|output verbose option displays usage, description, and additional information including examples of command usage. If you do not use the
-o|output option, usage information and a brief description of the command are displayed.
Specifying command
targets displays a complete list of valid targets for that command from
the fixed targets in /SP and /SYS. Fixed targets are targets that
cannot be created by a user.
Syntax
Options
Commands
Examples
Using the load Command
Use the load command to transfer an image file
from a source, indicated by a Uniform Resource Indicator (URI), to update ILOM
firmware. The URI can specify a protocol and credentials used for the transfer.
Only the TFTP protocol is supported, so the URI must begin with tftp://. If credentials are required and
not specified, the command prompts you for a password. Using the -script option eliminates the prompt for
a yes or no confirmation and the command acts as if yes were specified.
Syntax
Options
Example
-> load -source tftp://ip_address/newmainimage
Using the reset Command
Use the reset command to reset the state of the
target. You will be prompted to confirm a reset operation. Eliminate this
prompt by using the -script
option.
Syntax
Options
Targets
Examples
-> reset /SP

-> reset /SYS
Using the set Command
Syntax
Options
Targets, Properties, and Values
Examples
-> set /SP/users/susan role=administrator

-> set /SP/clients/ldap state=enabled binddn=proxyuser bindpw=ez24get
Using the show Command
Using the -display option determines the type of
information shown. If you specify -display
targets, then all targets in the namespace below the current
target are shown. If you specify -display
properties, all property names and values for the target are shown. With this
option you can specify certain property names, and only those values are shown.
If you specify -display all,
all targets in the namespace below the current target are shown, and the
properties of the specified target are shown. If you do not specify a -display option, the show command acts as if -display all were specified.
The -level option controls the depth of the show command and it applies to all modes
of the -display option.
Specifying -level 1 displays
the level of the namespace where the object exists. Values greater than 1
return information for the target's current level in the namespace and the
<specified value> levels below. If the argument is -level all, it applies to the current
level in the namespace and everything below.
The -o|output option specifies the output and
form of command output. ILOM only supports
-o table. When you use the -o
table option, the output is formatted in a condensed, three-column
table of targets, properties, and values.
The show components alias produces the same
output as the above command. Thus, it enables you to restrict the table output
to a single property below each target.
Syntax
Options
Targets and Properties
Examples
Target    | Property        | Value

----------+-----------------+--------------

/SYS/FRU1 | component_state | Enabled

/SYS/FRU2 | component_state | Disabled

/SYS/FRU3 | component_state | Enabled
Target          | Property  | Value

----------------+-----------+-------------------------

/SP/sessions/90 | username  | root

/SP/sessions/90 | starttime | Tue Apr 10 10:57:22 2007

/SP/sessions/90 | type      | shell
Using the start Command
Use the start command to turn on the target or to
initiate a connection to the host console. Using the -script option eliminates the prompt for
a yes or no confirmation and the command acts as if yes were specified. The -f|force option specifies that the action
will be performed immediately.
Syntax
Options
Targets
Examples
-> start /SP/console

-> start /SYS
Using the stop Command
Use the stop command to shut down the target or
to terminate another user's connection to the host console. You will be
prompted to confirm a stop command. Eliminate this prompt by using the -script option. The -f|force option specifies that the action
will be performed immediately.
Syntax
Options
Targets
Examples
-> stop /SP/console

-> stop -force /SYS
Using the version Command
Syntax
Options
Example
-> version

version SP firmware version: 2.0.0

SP firmware build number: 4415

SP firmware date: Mon Mar 28 10:39:46 EST 2007

SP filesystem version: 0.1.9
- Login to post comments
Solaris ILOM / ALOM Cheat Sheet
ILOM ALOM CMT Command Comparison
ALOM: ILOM:
setdate set
/SP/clock datetime=value
value format: MMDDhhmmYYYY
setdefaults set
/SP reset_to_defaults=all
-> reset /SP This resets the SP
setkeyswitch set
/SYS keyswitch_state=value
value= normal, diag, stby, locked
setsc set
target property=value
setupsc No
equivalent in ILOM
setlocator set
/SYS/LOCATE value= Fast_Blink or off
setfru -c data set
/SYS customer_frudata=data
showplatform show
/HOST
showplatform
show /SYS ( to view Serial Number )
showfru No
equivalent in ILOM
showusers -g # show
/SP/users
showhost show
/HOST
showkeyswitch show
/SYS keyswitch_state
showsc param show
target property
VIEW DIAG LEVEL show
/HOST/diag
setsc diag_level set /HOST/diag trigger=All-resets
none, normal, User-reset, Power-on-reset, Error-reset
showdate show
/SP/clock datetime
showlogs show
/SP/logs/event/list
showlogs show /SP/faultmgmt
set /SP/logs/event clear=true
showenvironment show
-o table -level all /SYS
shownetwork show
/SP/network
showlocator show
/SYS/LOCATE
password set
/SP/users/<username> password
restartssh set
/SP/services/ssh restart_sshd_action=true
usershow show
/SP/users
useradd user create
/SP/users/<username>
Create "admin" create /SP/users/admin
set /SP/users/admin role=Administrator
set /SP/users/admin cli_mode=alom
userdel user delete
/SP/users/<username>
userdel -y delete
-script /SP/users/<username>
userpassword set
/SP/users/<username> password
userperm user set
/SP/users/<username> role=permissions
consolehistory SEE
RENE FOR MORE INFO ;)
console -f start
-force /SP/console
break -c set
/HOST send_break_action=break
break -D set
/HOST send_break_action=dumpcore
bootmode set
/HOST/bootmode property=value
state=value "reset_nvram or
normal"
script="setenv auto-boot? false"
flashupdate -s load
-source tftp://ipaddr/pathname
reset -c reset
/SYS
reset -y -c reset
-script /SYS
powercycle stop
/SYS
powercycle -y stop
-script /SYS
powercycle -f stop
-force /SYS
start
-force /SYS
poweroff stop
/SYS
poweroff -y stop
-script /SYS
poweroff -f stop
-force /SYS
poweron start
/SYS
clearfault uuid set
/SYS/component clear_fault_action=true
removefru -y set
/SYS/PS0 prepare_to_remove_action=true
enablecomponent set
/SYS/component component_state=enabled
disablecomp set
/SYS/component component_state=disabled
clearasrdb No
equivalent in ILOM
resetsc reset
/SP
resetsc -y reset
-script /SP
userclimode set
/SP/users/<username> cli_mode=default or alom
logout exit
DISPLAYING DIMM INFORMATION:
-> show /SYS/MB/CMP0/BR0/CH0/D#
Targets:
SEEPROM
SERVICE
PRSNT
T_AMB
Properties:
type =
DIMM
component_state = Enabled
fru_name
= 4096MB DDR2 SDRAM FB-DIMM 333 (PC2 2600)
fru_description = FBDIMM 4096 Mbyte
fru_manufacturer = Samsung
fru_version = FFFFFF
fru_part_number = 501-7954-01 Rev 05
fru_serial_number = 00CE01074627037EA3
fault_state = OK
clear_fault_action = (none)
Setting up Network Managment Port ILOM:
-> set pendingipaddress=<ip_address>
-> set pendingipdiscovery=static
-> set pendingipnetmask=255.255.255.0
-> set pendingipgateway=<ip_address>
-> set commitpending=true
Setting up Network Managment Port ALOM:
sc> setsc if_network true
sc> setsc if_connection "telnet or ssh"
sc> setsc netsc_dhcp false
sc> setsc netsc_ipaddr <ip_address>
sc> setsc netsc_ipnetmask <netmask>
sc> setsc netsc_ipgateway <ip_address>
sc> setsc netsc_commit
ALOM CMT Variable Comparison
ALOM: ILOM:
diag_level /HOST/diag
level
diag_mode /HOST/diag
mode
diag_trigger /HOST/diag
trigger
diag_verbosity /HOST/diag
verbosity
if_connection /SP/services/ssh
state
if_emailalerts /SP/clients/smtp
state
if_network /SP/network
state
if_snmp /SP/services/snmp
mgt_mailalert /SP/alertmgmt/rules
mgt_mailhost /SP/clients/smtp
address
mgt_snmptraps /SP/sevices/snmp
v1|v2c|v3
mgt_traphost /SP/alertmgmt/rules
/SP/services/snmp
port
netsc_dhcp /SP/network
pendingipdiscovery
netsc_commit /SP/network
commitpending=true
netsc_enetaddr /SP/network
macaddress
netsc_ipaddr /SP/network
pendingipaddress
netsc_ipgateway /SP/network
pendingipgateway
netsc_ipnetmask /SP/network
pendingipnetmask
sc_backupuserdata /SP
BACKUP_USER_DATA
sc_customerinfo /SP
system_identifier
sc_escapechars /SP/console
escapechars
sc_powerondelay /SP/policy
HOST_POWER_ON_DELAY
sc_powerstatememory /SP/policy
HOST_LAST_POWER_STATE
States= enabled or disabled
ser_baudrate /SP/serial/external
pendingspeed
ser_data No
equivalent in ILOM
ser_parity /SP/serial/external
pendingparity
ser_stopbits /SP/serial/external
pendingstopbits
sys_autorestart /SP
autorestart
sys_autorunonerror /SP
autorunonerror
sys_eventlevel No
equivalent in ILOM
sys_enetaddr /HOST
macaddress
Procedure to set the Serial Number after PDB
replacement:
sc> setsc sc_servicemode true
Warning: misuse of this mode may invalidate your
warranty.
sc> setcsn -c chassis_serial_number
Are you sure you want to permanently set the Chassis
Serial Number
to chassis_serial_number[y/n]? y
Chassis serial number recorded.
sc> showplatform
SUNW,Sun-Fire-T5120
Chassis Serial Number: chassis-serial-number
Domain Status
------ ------
S0 Running
sc>setsc sc_servicemode false
HOW TO RESET ILOM PASSWORD:
InfoDoc #: 209731
Power down the host system (using the front panel
powerbutton)
or if an SP admin account exists, you can alternatiely
use that
accounts ALOM Command Line Interface poweroff command.
Unplug the system's power cord(s) Remove the system's
top cover.
Insert a Jumper
(you provide the jumper) on Pins 1 & 2 of PJ6801.
This Jumper is
located at the T5120/T5220 Motherboard
Insert a Jumper
(you provide the jumper) on Pins 1 & 2 of J10401
This Jumper is
located on the SP of the T5140/T5240
- near the edge of the Motherboard at rear of the
system -
center of the
rear edge of the Motherboard.
Plug in the system's power cord(s).
Press the front panel Power button to power on the
system.
You must power
on the system to complete the reset.
This is because the state of the PJ6801 jumper cannot
be
determined without the host CPU running.
The SP root password will be reset to the default changeme.
Log in as root into the SP, using any available method
- ssh
or a Web Browser to the SP's network management port
or via
tip-hardware or a terminal server to the SP's serial
management
port.
Password to use
is changeme.
That is simply to see if the changeme password works.
Power down the system using the front panel
Unplug the system's power cord(s)
Remove the PJ6801 jumper. You must remove the PJ6801
jumper
after resetting the password, or the password will be
reset
every time the SP is reset (e.g. at power up).
Replace the system's top cover.
Plug in the system's power cord(s).
If the system administrator would like the SP's root
account
password changed to something other than changeme
Then you
can change the root password using the usualSP's root account's
Command Line User Interface command. Whether or not
the SP's root
account password is to be changed to something
different than changeme
after the top cover has been reinstalled and the
system's power cord(s)
plugged-in, if the system administrator would like the
Host powered-up,
that can be done using the front panel power button or
via a login to
the SP's root or admin accounts and the appropriate
START or
power on, respectively, may be used.
Membuat file
tar.gz
Cara untuk
membuat file tar.gz di CLI sebenarnya mudah-mudah gampang… hanya saja anda
harus teliti di direktori mana anda sedang bekerja. Karenanya, sering-seringlah
menggunakan ‘pwd’… Ok…
Untuk
pertama, kita membuat file archievenya dulu… saat ini saya bekerja di direktori
“/home/auril_zeck/” dan saya akan mengompres file bernama “test.mp3″.
Pertama,
mari kompress filenya dengan perintah
tar -cvf
test.tar coba.mp3
*tar -cvf
test.tar = membuat file arvhieve bernama “test.tar”
*coba.mp3
= file yang akan di archieve.
ehhmm.. gak
ada tampilan spesial setelah kita selesai melakukan archieving… jadi ga perlu
screenshoot, ya…hehehehe (sayang free space)
untuk
melihat isi file test.tar, ketik
tar
-tf test.tar
Untuk
mengekstrak file via CLI, sebaiknya dilakukan di dalam direktori baru… jadi
langkah2nya adalah…
1. Buat
folder kosong dengan command:
mkdir
ekstrak
2. Copy file
test.tar ke folder ekstrak. command:
cp test.tar
ekstrak
3. Masuk ke
folder ekstrak. command:
cd ekstrak
4. Kita
keluarkan isi dari file test.tar dengan command:
tar -xf
test.tar
naahh…udah
keluar,kan filenya… buat ngece, ketik aja:
ls -l
Sekarang
kita zip file test.tar… caranya…
*masih dalam
direktori “ekstrak”….
ketik
command:
gzip
test.tar
untuk
mengekstrak, ketik
gzip -d test.tar.gz
naahh..selesai…
gzip -d test.tar.gz
naahh..selesai…
(file
test.tar otomatis terhapus diganti file test.tar.gz)
cek
terakhir, kita liat ukuran filenya…ketik aja “ls -l” di direktori ekstrak…
-4197…byte
setelah
di-”tar” 4286…byte
setelah di
tar.gz jadi 4098…byte…
OK…gampang,
kan
Tidak ada komentar:
Posting Komentar